This is the first post of a collection of GitOps tools articles. In this post, a continuous deployment tool for Kubernetes is reviewed: ArgoCD. If you missed previous articles on Kubernetes deployments and Helm, give them a read before going through this one, as it will help you better understanding the general idea.
GitOps
GitOps is defined as a way of managing Kubernetes infrastructure and applications, in which git repositories hold the declarative definition of what has to be running in Kubernetes. A git repository is considered as the single source of truth in the GitOps model. With this approach, changes in the application definitions (code), are reflected on the infrastructure. Besides, it is possible to detect differences and drifts between the source controlled application and the different versions deployed.
GitOps allows faster delivery rates, as once the code is pushed to the production branch, it will be present in the cluster in a matter of seconds, increasing productivity. This Model also increases reliability, as rollbacks and recovery procedures are eased by the fact that the entire set of applications is control versioned by Git. Furthermore, stability and consistency is also improved.
GitOps tools by hackernoon
ArgoCD
ArgoCD is a continuous deployment tool which works in a declarative way. It is installed in a Kubernetes cluster and it can deploy applications within the cluster or in some other clusters, allowing for a centralized and automatic deployment control, application version tracking in each environment, configuration drift detection and health status monitoring of the applications’ resources. Thanks to its version tracking feature, it eases rollbacks and upgrades of the applications.
Setting ArgoCD up
For a quick start, ArgoCD can be installed from its Kubernetes manifests. By issuing the command below, ArgoCD will be installed in a dedicated namespace, with all the resources it will need to operate in the cluster, including a pretty useful web interface. Notice that this installation is the simplest setup, as it will be used for testing purposes. For production environments, more complex and resilient architectures can be used.
kubectl create namespace argocd
kubectl apply -n argocd -f https://raw.githubusercontent.com/argoproj/argo-cd/stable/manifests/install.yaml
As Kubernetes itself, Argo CD has its own control plane, including an API server, a repository server and a controller. These three components are the pieces that make ArgoCD’s magic possible 🧙🏽♂️:
- The API server allows interaction with ArgoCD from the web UI, from the CLI and eases its integration with CI/CD platforms and pipelines.
- ArgoCD’s application controller is in charge of monitoring the applications deployed in the cluster, fixing any drift from the desired state by synchronizing the existing Kubernetes objects with the ones defined in the git repository.
- The repository server, caches the git repository associated to each application deployed in the cluster. It generates the Kubernetes manifest that are deployed in the cluster from the source code, applying configuration management tools and plugins when necessary.

Architecture by ArgoCD
In order to interact with ArgoCD API server in a programmatic way, its CLI can be installed. Get the CLI version for your OS here.
brew tap argoproj/tap
brew install argoproj/tap/argocd
ArgoCD’s API server is not exposed out of the cluster with its minimal setup, so in order to make it reachable from outside, either an ingress controller or a LoadBalancer can be used. In order to keep this example simple, we will just patch ArgoCD’s API server service so that it is exposed using a LoadBalancer.
kubectl patch svc argocd-server -n argocd -p '{"spec": {"type": "LoadBalancer"}}'
After deploying ArgoCD’s components and patching the API service, these are the set of pods and services that will be running in the cluster. Notice that ArgoCD’s load balancer uses localhost as an external IP since minikube was used for this example.
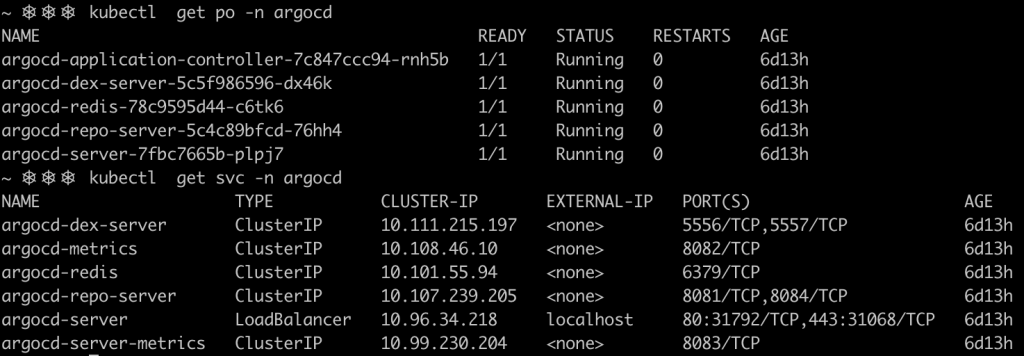
For this initial setup, ArgoCD uses the name of the API server pod as the admin password, so in this case, the password is argocd-server-7fbc7665b-plpj7. Login into the server using the CLI and change the password.
argocd login <argocd-server-ip>
argocd account update-password
Using the GUI
Now it’s time to try the recently set password in the web interface. You can reach the web interface by accessing the IP of the load balancer service (localhost if using minikube) on the port 80 or 443. Once you are successfully logged into the server, you will have access to the main dashboard, from where all the applications and components deployed into the cluster or external clusters are managed.
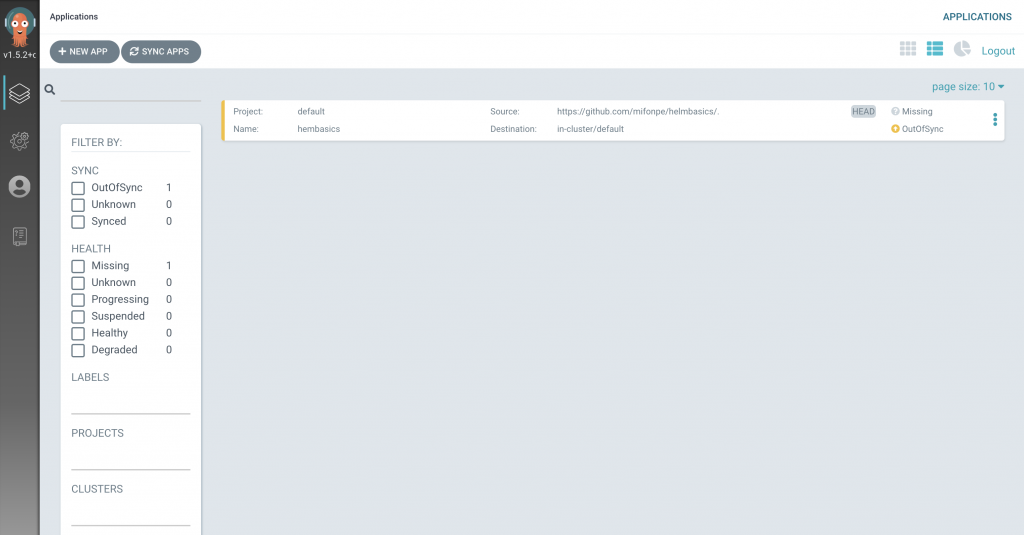
To deploy a new application, we will need to add a repository, so that the code can be fetched. In this case, we will be using a simple helm application that has been used in previous posts. It deploys a set of pods using Nginx containers. Notice that you can add security credentials as well as a TLS certificate to use a secure connection. Furthermore, connections to the repository can be done by using SSH keys.
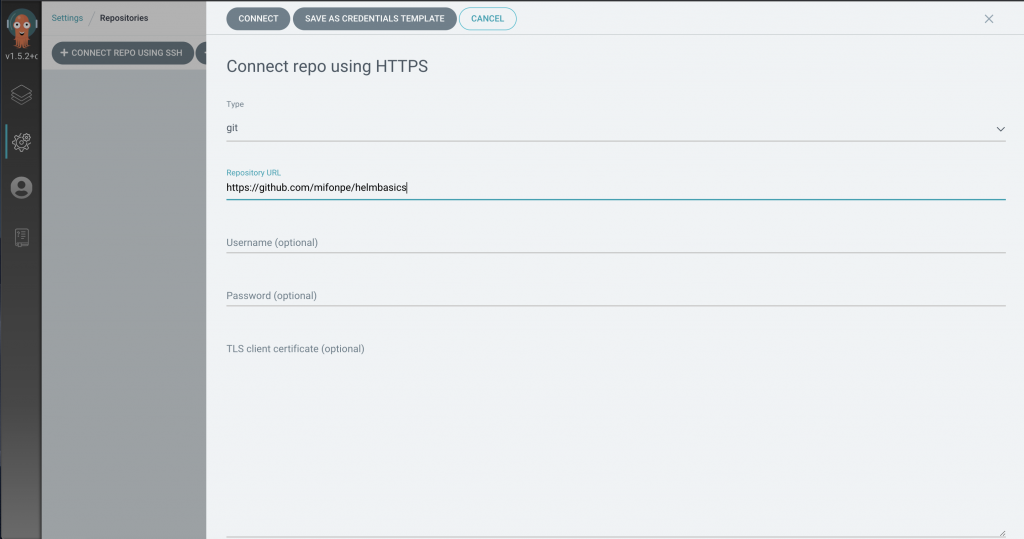
Once the repository has been configured, we can start creating our first application. Check first wether ArgoCD can connect to the example repository.

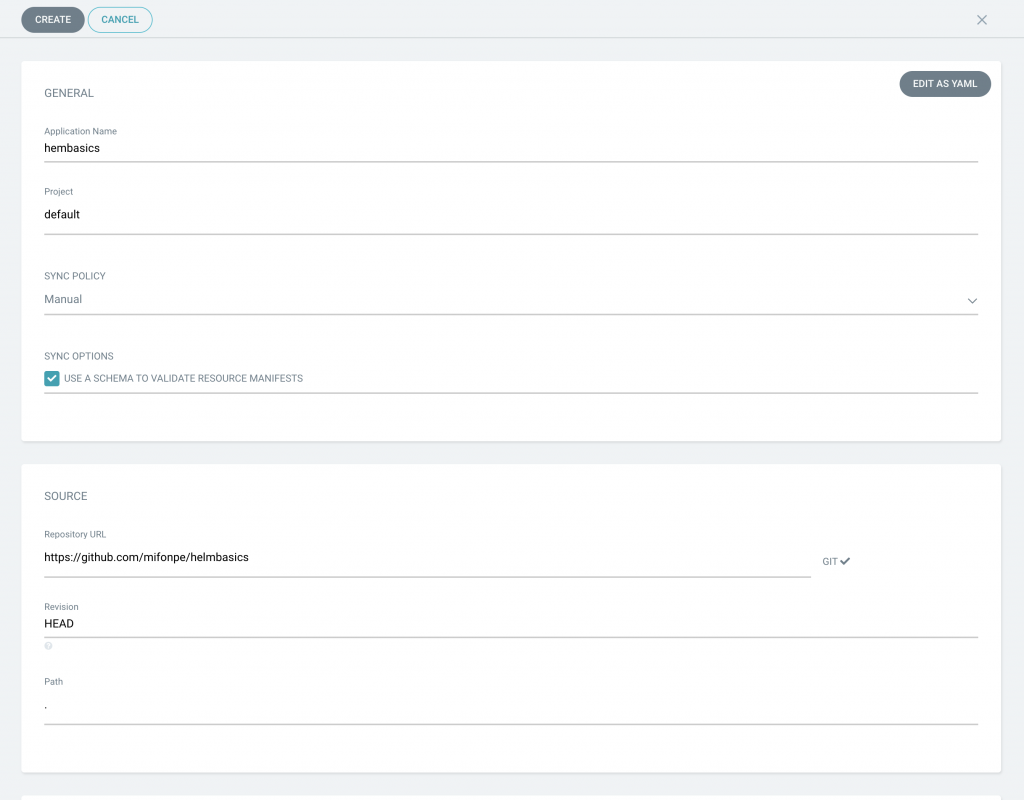
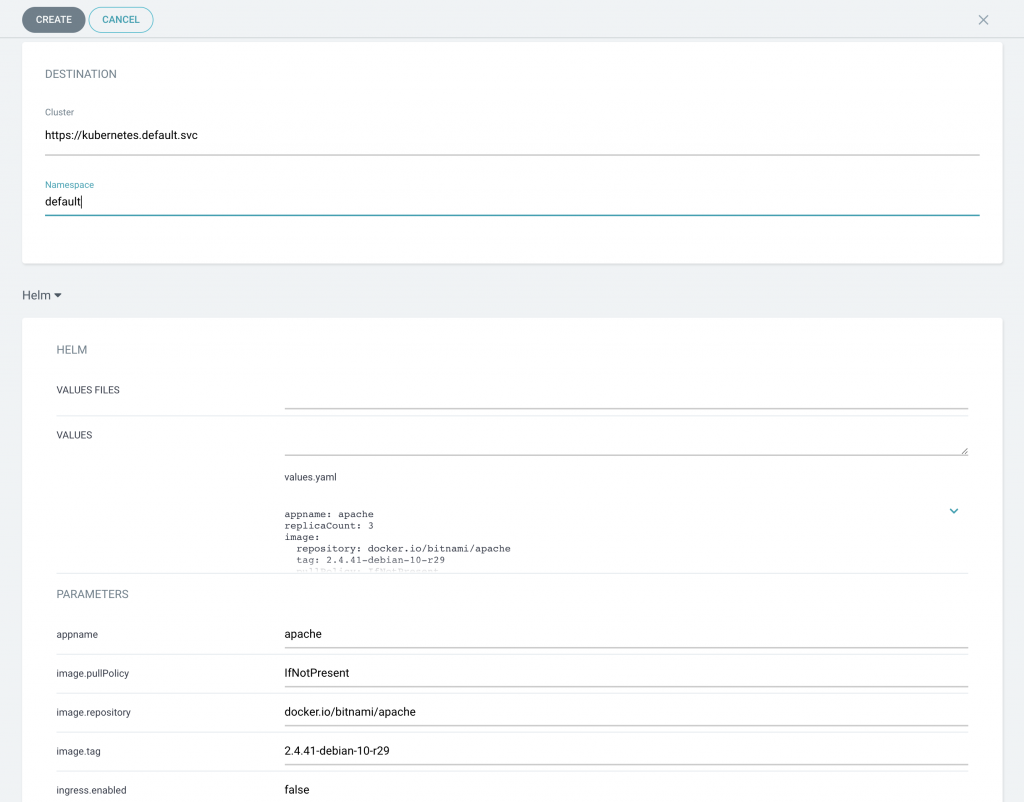
In order to create a new application, some parameters need to be specified, such as its name, the git repository to use and its path, as well as the Kubernetes cluster and namespace where the application is to be deployed. In this step, the synchronization policy can also be defined. For this example, the application will be deployed manually within the same cluster, in a different namespace, but several clusters can be added in order to be managed by the ArgoCD server. Notice that HEAD revision is selected, so the master branch will be fetched, and . is the path that will be used within the repository.
For this application, Helm is to be used as a templating language. Furthermore, ArgoCD supports Kustomize and Ksonnet as Kubernetes configuration management tools, as well as raw Kubernetes manifests. ArgoCD’s functionalities can be extended by using plugins, which allow its integration with other external configuration management tools. Notice how ArgoCD detects the values.yaml file and allows modifying the values in-line, prior to the deployment.
If you click on the added application in the main dashboard, you will notice that ArgoCD has identified all the Kubernetes components that make up the entire application. This visualization dashboard, can be pretty handy for complex deployments, as dependencies between resources can be easily identified.
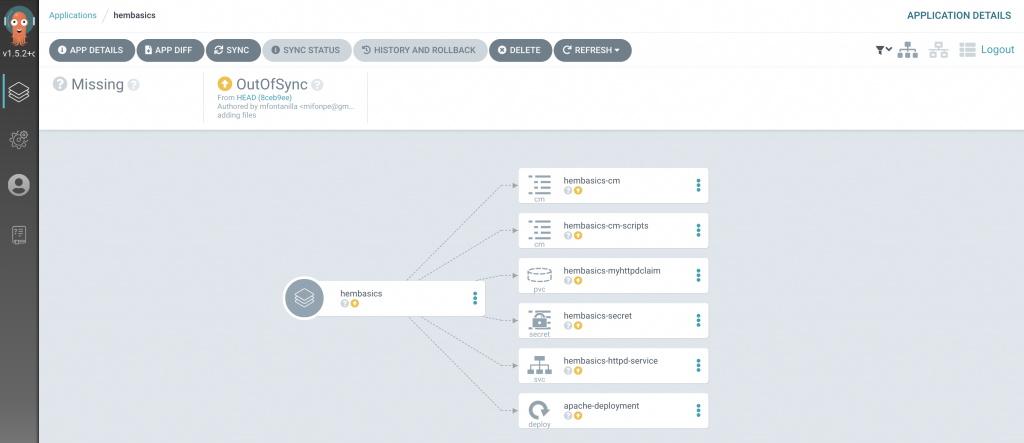
ArgoCD detects the applications in a OutOfSync status, since this application has been deployed with a manual synchronization policy. Thus, there are no components deployed in the cluster yet. Notice how different options can be selected for the deployment, including dry-run deployments, ideal for application validations.
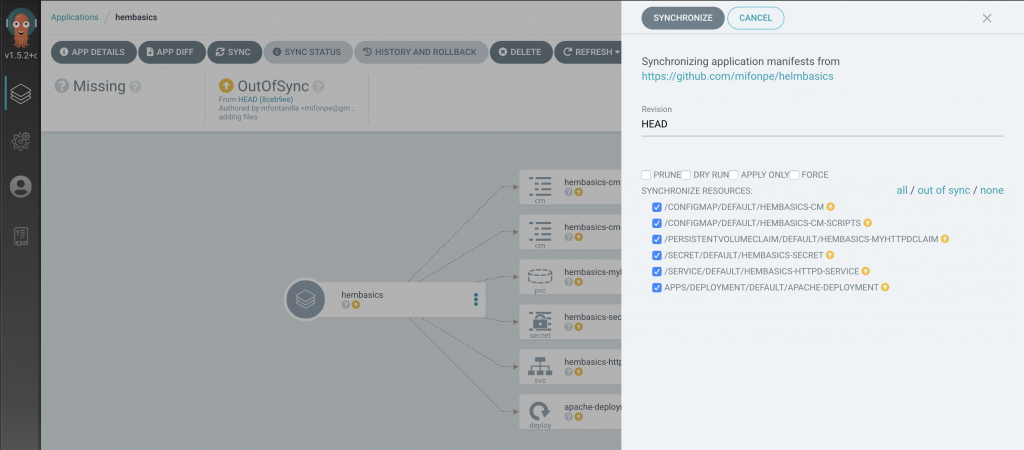
Let’s synchronize the application manually! Click the sync button and you will see how the application is being deployed in real time. When the synchronization ends, you will be able to see the pods that have been deployed as well as the rest of Kubernetes objects defined in the manifests.
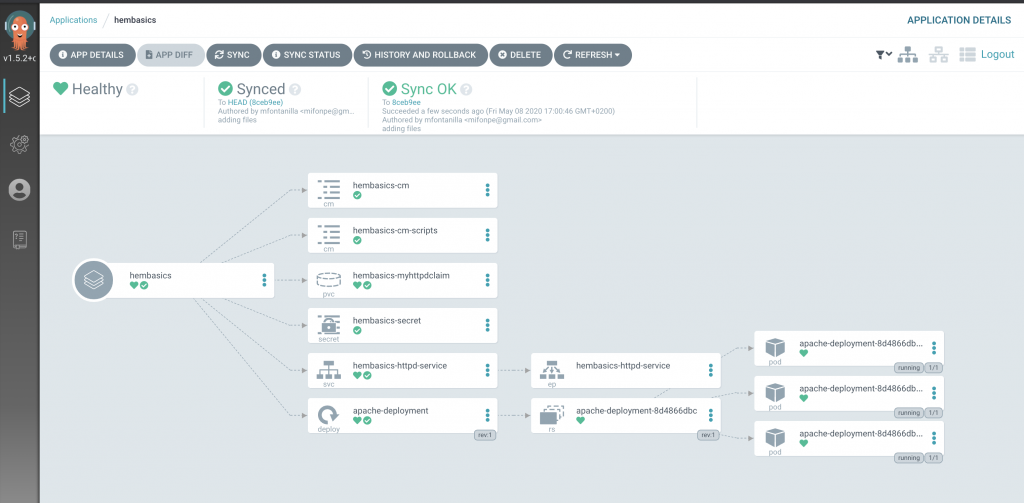
It’s interesting to notice how the state of the application shown by ArgoCD matches with the resources that have been deployed in the cluster. However, the dashboard above, offers a more user friendly way of visualizing the resources.
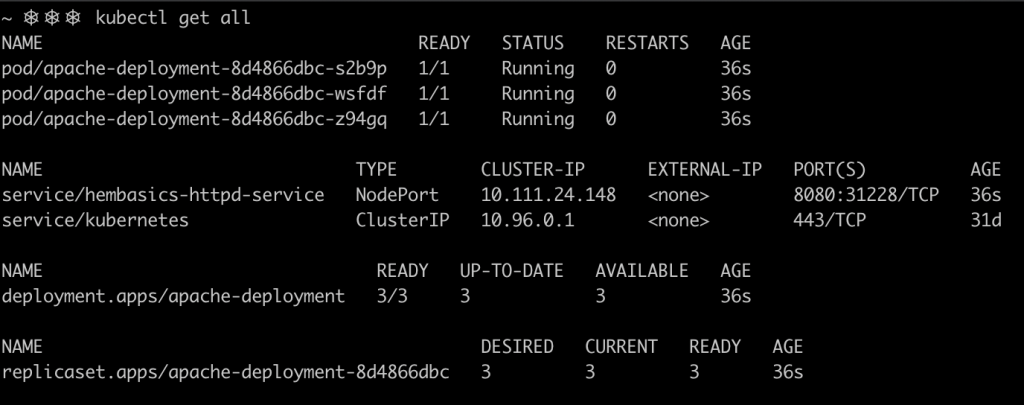
Using the CLI
Since ArgoCD’s API server is what really powers the web interface, by interacting with ArgoCD’s API, you can perform the same actions that are supported by the web interface. And what’s better that ArgoCD’s CLI to interact with the API server?
You can check and synchronize your existing applications in the cluster with the CLI. This can be specially useful for automation purposes. The following commands list the applications tracked by ArgoCD and describe a specific application and its current status and components.
argocd app list
argoc app get yourappname
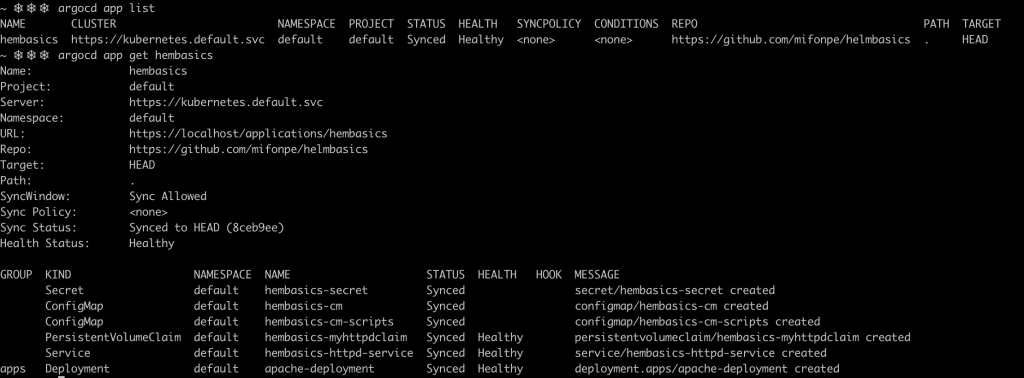
Besides, the CLI can be used to deploy an application using an explicit definition. ArgoCD CLI supports a wide variety of flags and options, so if you want to learn more about it, the integrated CLI help can a pretty useful resource.
argocd app create helmcli --repo https://github.com/mifonpe/helmbasics --path . --dest-namespace test --dest-server https://kubernetes.default.svc
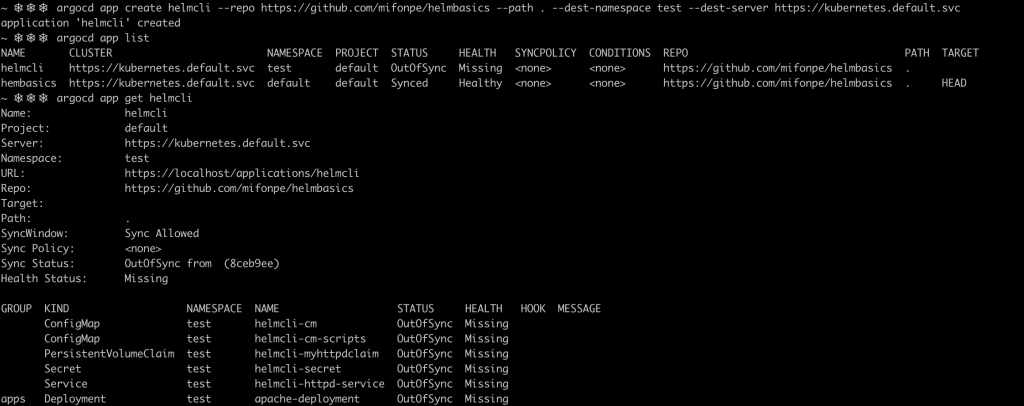
As you can notice, the application wasn’t deployed successfully, as the service was exposed using the same nodePort as the previous deployed application. Since Kubernetes nodePorts bind services to ports in the underlying nodes, the same port cannot be used by two different services.
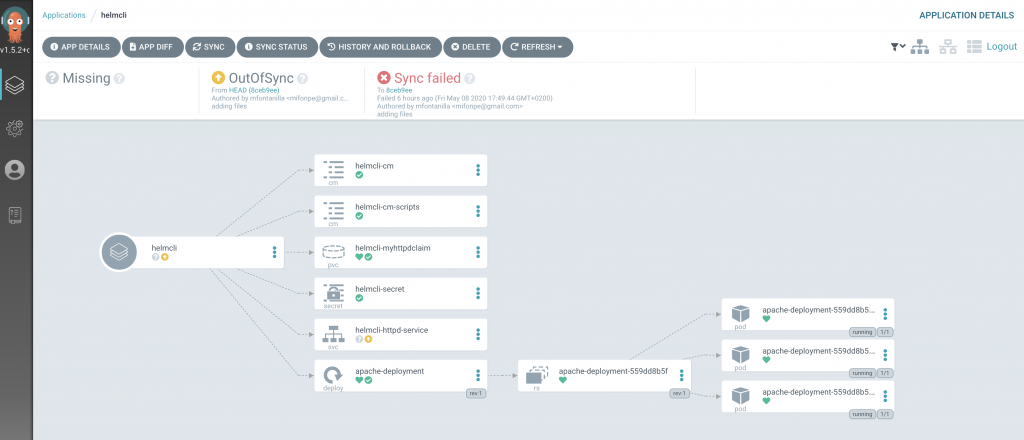
Let’s fix this problem quickly. Using the web interface, inspect your application details, and then just edit its parameters, in this case, the nodePort values, so that each deployment use a different port. After editing the values, manually synchronize the application.
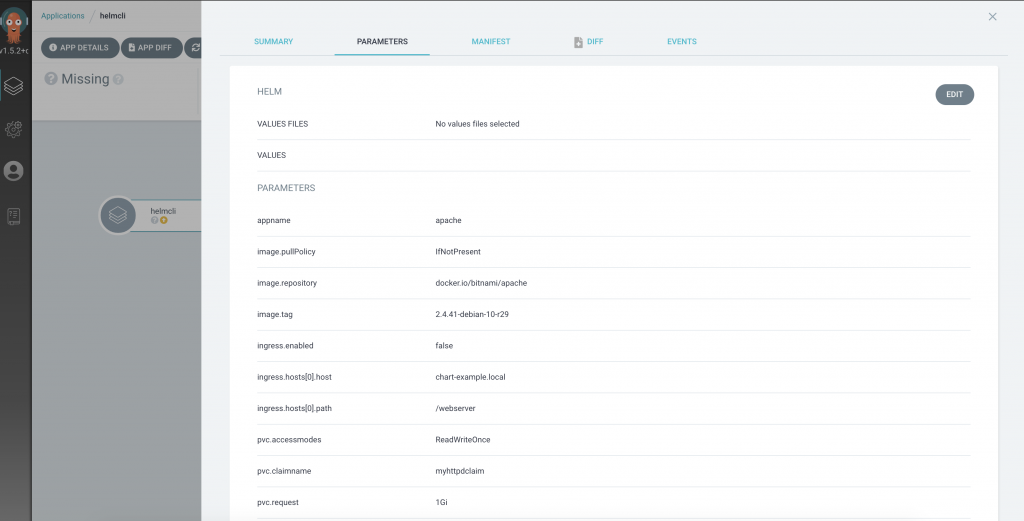
With the modified NodePort values, this new application can be successfully deployed.

Finally, let’s clean up our cluster using the CLI. By issuing the command below, the specified application and its associated resources are removed.
argocd app delete yourappname
Declarative definition
ArgoCD’s applications can be defined as yaml documents itself, making it possible to handle configuration as code, and enabling the automation of the applications setup. This is what is known as declarative setup. To set up an application using the declarative way, it will need to be created it in the namespace where ArgoCD is running. The code below, shows the content of app.yaml, a declarative application definition.
apiVersion: argoproj.io/v1alpha1
kind: Application
metadata:
  name: declarative
  namespace: argocd
spec:
  project: default
  source:
    repoURL: 'https://github.com/mifonpe/helmbasics'
    path: .
    targetRevision: HEAD
  destination:
    server: 'https://kubernetes.default.svc'
    namespace: default
By applying it into the cluster, the application will be available in ArgoCD, but since automatic synchronization was not selected, the application shows again an OutOfSync status.
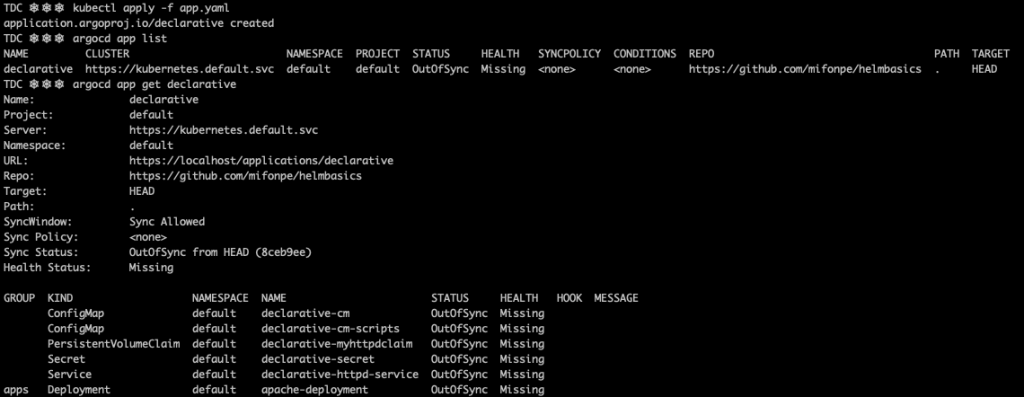
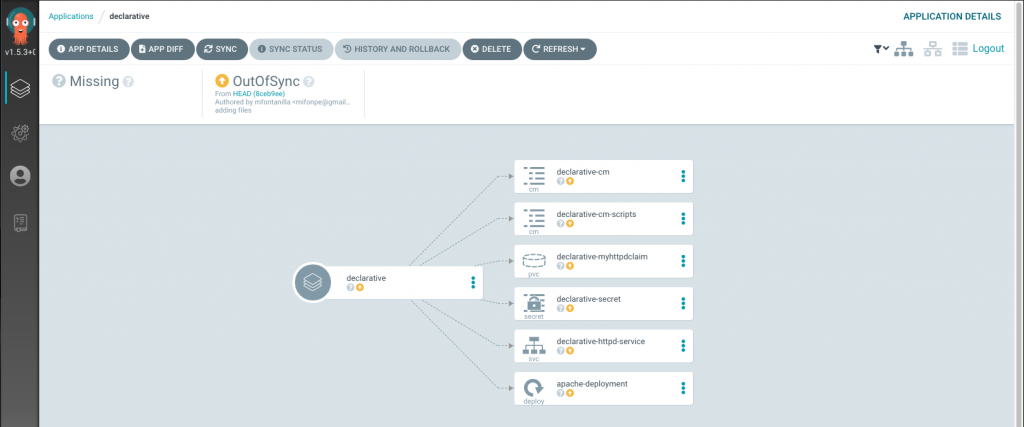
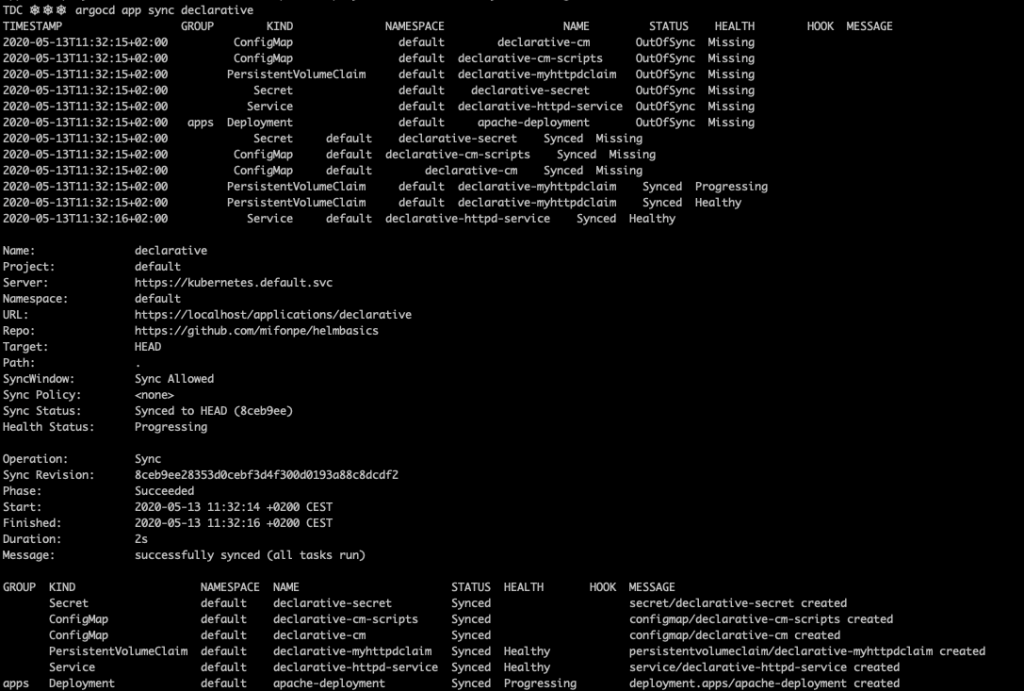
As commented before, the CLI can be also used to synchronize the applications present in the cluster.
Finally, if the application object in the cluster is deleted, the application will no longer be available in ArgoCD.

Automatic synchronization
In order to achieve continuous deployment, automatic synchronization can be enabled for applications. Notice that two options appear when the automatic synchronization policy is selected: prune and self-heal. The former ensures that resources which are no longer defined in the git repository are deleted, and the latter allows ArgoCD to recreate those resources which differ from the original manifests. For this example, both will be checked. Besides, a different branch will be used now, the production branch. You will not be able to reproduce this exact example as the public repository cannot be edited for security reasons. If you want to try it, you can fork the helm basics repository, and set up a new application which uses your URL. Don’t forget to use SSH keys or user/password authentication.
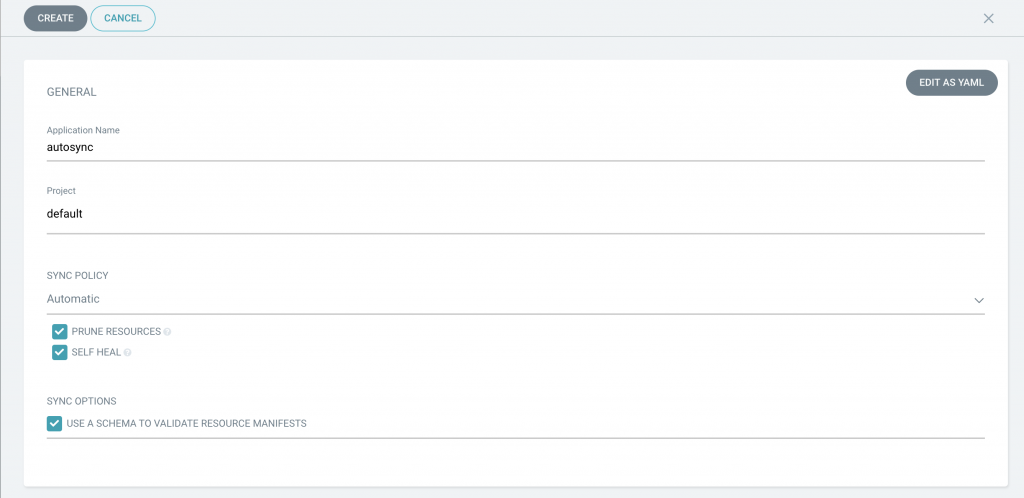
The best way of testing ArgoCD self healing features is to play with our deployment. Let’s scale the deployment down by one replica to leave just two pods running. You will notice that it’s almost impossible to do so, as ArgoCD immediately detects the deviation in the number of pods and corrects it, deploying a third pod.

Furthermore, ArgoCD detects new commits in the repository branch selected during the application setup. Thus, any modification in the code, will be deployed automatically in the cluster when the automatic synchronization feature is enabled. For this example, the replicaSet number is set to five pods in the values file for the production branch.
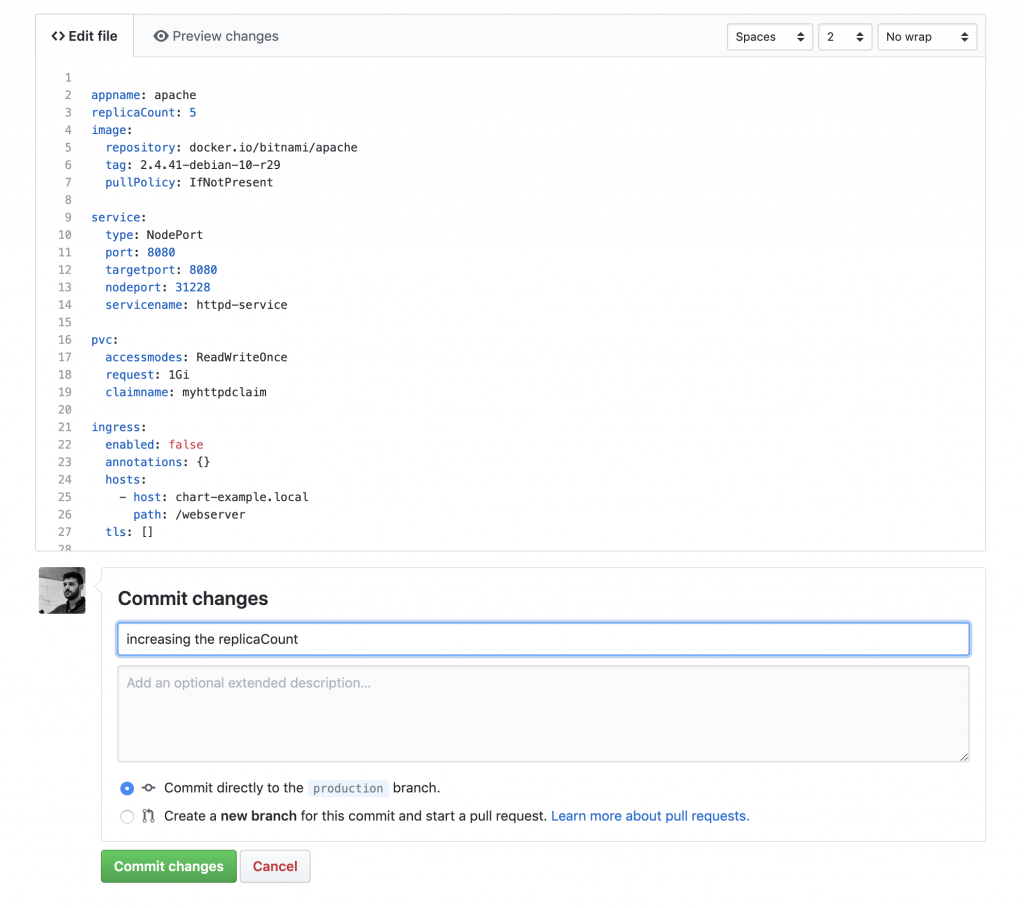
After committing the changes to the tracked branch, and waiting for ArgoCD to detect the changes (20 to 30 seconds), two additional pods are deployed in our application.
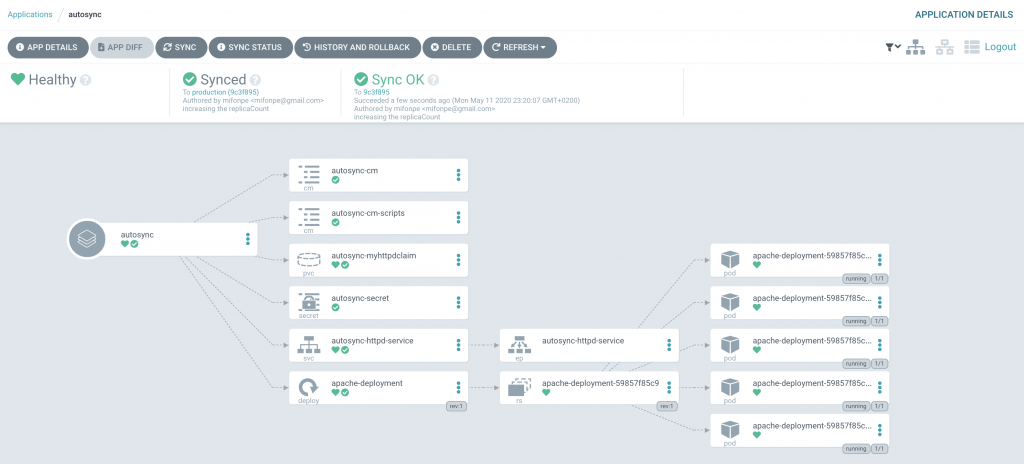
ArgoCD CLI allows application history inspection, showing the git SHA-1 checksums associated with each synchronization.

In case you want to clean your cluster after this tutorial, first delete the application, and after that you will just need to delete ArgoCD’s resources and its namespace.
argocd app delete yourappname
kubectl delete -n argocd -f https://raw.githubusercontent.com/argoproj/argo-cd/stable/manifests/install.yaml
kubectl delete namespace argocd
Conclusion
In this post, ArgoCD was introduced as continuous deployment tool and as a GitOps enabler. This tool helps automating Kubernetes applications deployment, as well as ensuring that what is running in the cluster matches the content your git repository. This behavior provides very useful features: application health analysis, automatic drift detection, version tracking and rollback to virtually any previous existing point in time.
In addition, ArgoCD offers its own API server and web interface, which shows the state of the applications in real time, and its own CLI, ideal for integration with CI pipelines. This features, are what make ArgoCD a great choice to be integrated in an end to end CI/CD pipeline for cloud native environments.
If you want to know more about ArgoCD, read the docs.
