This is the second post of a collection of GitOps tools articles. In this post, a continuous deployment tool for Kubernetes is reviewed: FluxCD. The previous post focused on ArgoCD.
If you missed previous articles on Kubernetes deployments and Helm, give them a read before going through this one, as it will help you understand the general idea a bit better.
GitOps
GitOps is defined as a way of managing Kubernetes infrastructure and applications, in which git repositories hold the declarative definition of what has to be running in Kubernetes. A git repository is considered as the single source of truth in the GitOps model. With this approach, changes on the application definitions (code), are reflected on the infrastructure. Besides, it is possible to detect differences and drifts between the source controlled application and the different versions deployed.
GitOps allows faster delivery rates, as once the code is pushed to the production branch, it will be present in the cluster in a matter of seconds, increasing productivity. This Model increases reliability, as rollbacks and recovery procedures are eased by the fact that the entire set of applications is control versioned by Git. Furthermore, stability and consistency are also improved.

GitOps tools by hackernoon
FluxCD
FluxCD is a declarative deployment automation tool which is controlled by means of its CLI, fluxctl. FluxCD uses an operator installed in the cluster to ensure that the state of the objects deployed in the cluster matches the configuration defined in a git repository. Operators are a way of extending Kubernetes functionalities in order to manage applications. They watch and interact with the Kubernetes API and control custom resources, which are what actually allow extending Kubernetes behavior. Long story short: operators listen to events and react to them performing actions over the components deployed in the cluster.
For this example, FluxCD will be used alongside its Helm v3 operator. So although the flow gets a little bit trickier, the added complexity is worth it. The diagram below shows the different pieces that interact to get our helm charts automatically deployed.
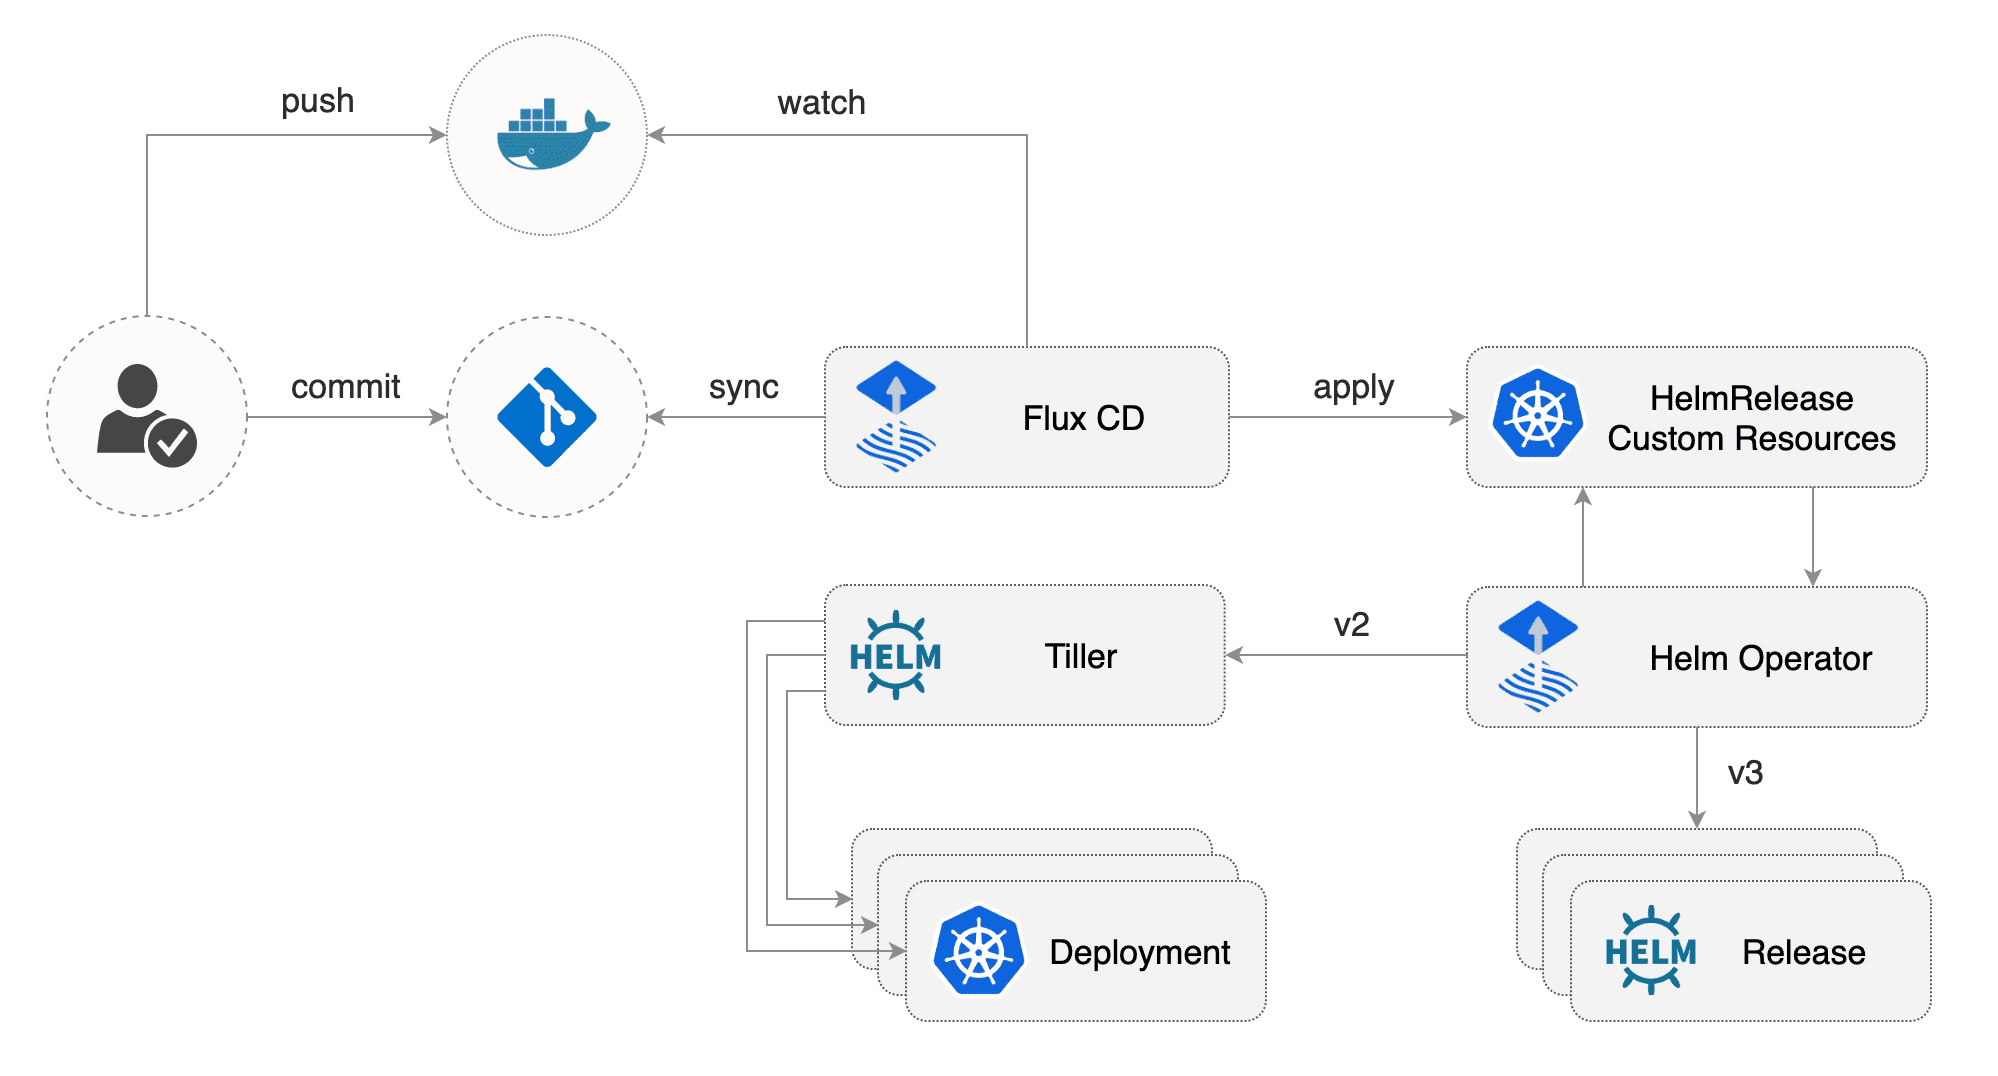
FluxCD+Helm Operator architecture by Flux project
First, the FluxCD operator watches for changes in the code in the git repository, and whenever a new change is committed, it applies those changes into the cluster. Now is when the story gets interesting: rather than applying changes in the charts deployed themselves, it applies changes on specific custom resources known as HelmReleases. These resources trigger another operator in turn, the Helm operator, which is what actually synchronizes the changes in the chart code into the deployed releases. Besides, FluxCD can watch for new versions of the Docker images used by the charts and trigger updates and new deployments.
Setting FluxCD up
To reproduce the examples that we are about to go through, you will need a Kubernetes cluster. Since you don’t really need a big cluster with HA features for these examples, consider using Minikube or Docker desktop. I used Docker desktop.
The first step is to install FluxCD’s CLI: get the latest release of its binary for your platform and place it within your $PATH. Once you get it, the next step will be installing Helm v3 CLI, following the exact same procedure. HelmV3 binaries can be found here. With both CLIs installed, you can start deploying FluxCD resources using Helm. To do so, first add FluxCD’s Helm repository and after that, create a dedicated namespace.
helm repo add fluxcd https://charts.fluxcd.io
kubectl create namespace fluxcd
Install FluxCD’s specifying the repository which holds the code of the helm chart to be used. In this case, you can fork this public repository that has been specifically developed for the article. It contains a simple Helm chart which deploys a web server, as well as an Nginx ingress controller. Besides, it contains the configuration used by FluxCD to deploy the helm chart in different environments with different values and parameters.
helm upgrade -i flux fluxcd/flux --wait --namespace fluxcd --set git.url=git@github.com:yourusername/helmflux
The repository is organized as shown below. Apart from the Helm charts themselves, it contains the namespaces where FluxCD will deploy resources and specific configuration for the Helm operator in the releases directory. For this example three different environments are considered: development, staging and production, and they are implemented by means of separate Kubernetes namespaces. Besides, three main branches are used in the repository, aligned with the environments: development, staging and master (production).
mifonpe/helmflux
      |
      helmbasics/
      |
      nginx-ingress/
      |
      releases/
      |    dev.yaml
      |    pro.yaml
      |    stg.yaml
      |    ingress.yaml
      |
      namespaces/
           dev.yaml
           pro.yaml
           stg.yaml
           ingress.yaml
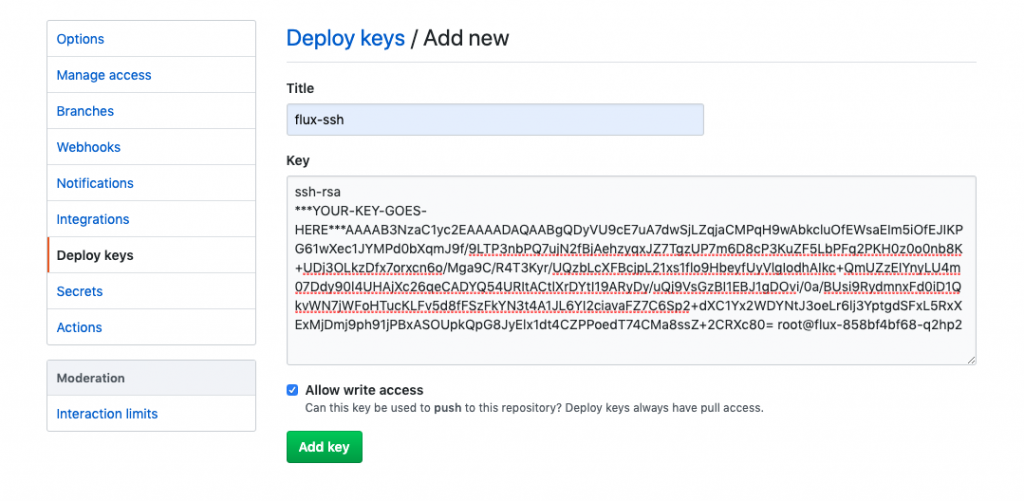
Now you have to grant FluxCD access to your git repository by using a SSH public key. FluxCD automatically generates a key, and it can be retrieved using fluxctl.
fluxctl identity --k8s-fwd-ns fluxcd
If you use GitLab or GitHub, you will have to paste this public key in the access control settings of the repository. In GitHub, go to Settings>Deploy Keys and paste the public key provided by fluxctl command. Allow write access to the repository.
The next step is to install a Kubernetes custom resource, known as HelmRelease. This object represents a Helm release for a specific chart, and contains some important parameters, such as the namespace to deploy the chart in, the release name that will be used by helm as well as the git repository, path and branch where the chart can be found. Notice the fluxcd.io/automated annotation. When set to true, any changes in the repository within the specific path and branch, will automatically trigger the synchronization carried out by FluxCD. The snippet below shows the Helm release that will be deployed into the development namespace. The HelmRelease allows overriding default values provided in the values.yaml file of the chart.
apiVersion: helm.fluxcd.io/v1
kind: HelmRelease
metadata:
  name: helmbasic-develop
  namespace: develop
  annotations:
    fluxcd.io/automated: "true"
spec:
  releaseName: helmbasic-develop
  chart:
    git: git@github.com:yourname/helmflux
    path: helmbasics
    ref: develop
  values:
    environment: development
    replicaCount: 1
    ingress:
      host: mywebserver.dev.kubesandclouds.com
The HelmRelease definition for production and staging environments use different values, to emulate different configurations and features for the chart depending on the environment. Take your time to check these configuration files and the values defined in the files.
To use HelmReleases, it is necessary to ‘install’ them before. The command below does it, by deploying HelmRelease Custom Resource Definition (CRD). CRDs specify how to use and interact with Kubernetes custom resources.
kubectl apply -f https://raw.githubusercontent.com/fluxcd/helm-operator/master/deploy/crds.yaml
After that, the FluxCD Helm operator needs to be installed in the cluster, so that Helm charts can be automatically deployed. Notice that the specified version to use is Helm v3. This operator supports both Helm v2 and Helm v3.
helm upgrade -i helm-operator fluxcd/helm-operator --wait \
--namespace fluxcd \
--set git.ssh.secretName=flux-git-deploy \
--set helm.versions=v3
‘Deploying’ everything
After setting up the different components, if you wait some minutes and after that you inspect the cluster, you will notice that the defined resources in the repository have been deployed.


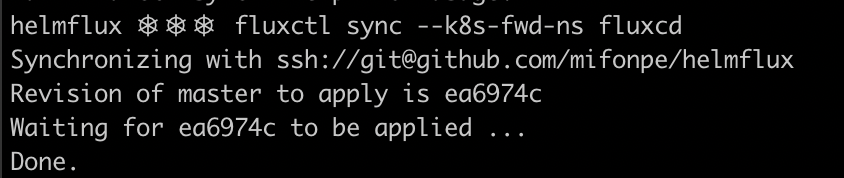
FluxCD uses a default polling interval of 5 minutes, meaning that it queries the git repository each 5 minutes to determine whether there are any changes to deploy. However, if you don’t want to wait that long, or the automatic synchronization feature is not being used, you can synchronize your repository manually by issuing the command below. Fluxctl needs to know the exact namespace where FluxCD was deployed. It can be specified using the --k8s-fwd-ns flag. Notice the SHA of the last commit.
To inspect the HelmRelease objects deployed by FluxCD’s synchronization, you can use the following command.
kubectl get hr -A

Remember that for this laboratory I used Docker Desktop, meaning that the entire cluster is running inside our machine, including the load balancers that the nginx ingress controller uses to route the HTTP/HTTPS traffic to the services in the cluster. Thus, to access the services using their DNS names use the command below. It will tell your computer to route the traffic targeting mywebserver.dev.kubesandclouds.com, mywebserver.staging.kubesandclouds.com and mywebserver.pro.kubesandclouds.com to your that ‘internal load balancer’ running in your host.
sudo sh -c 'echo "127.0.0.1 mywebserver.dev.kubesandclouds.com mywebserver.pro.kubesandclouds.com mywebserver.staging.kubesandclouds.com" >> /etc/hosts'
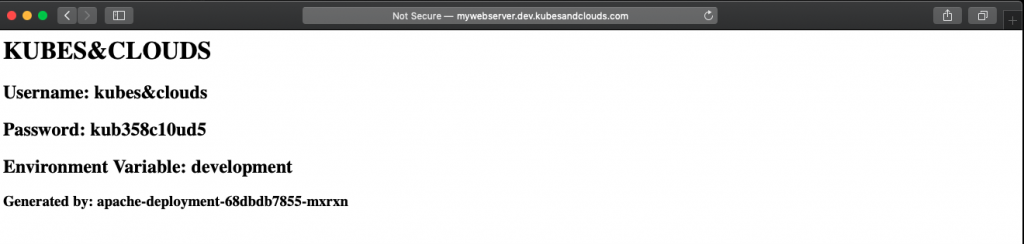
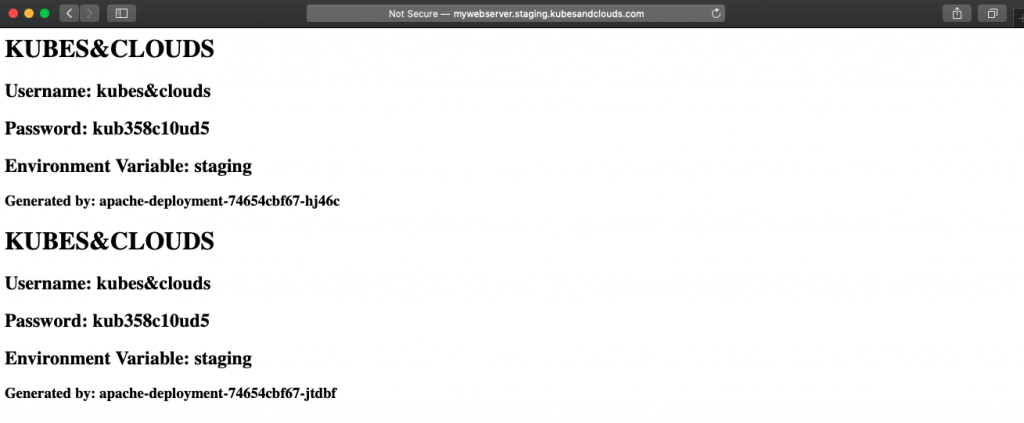
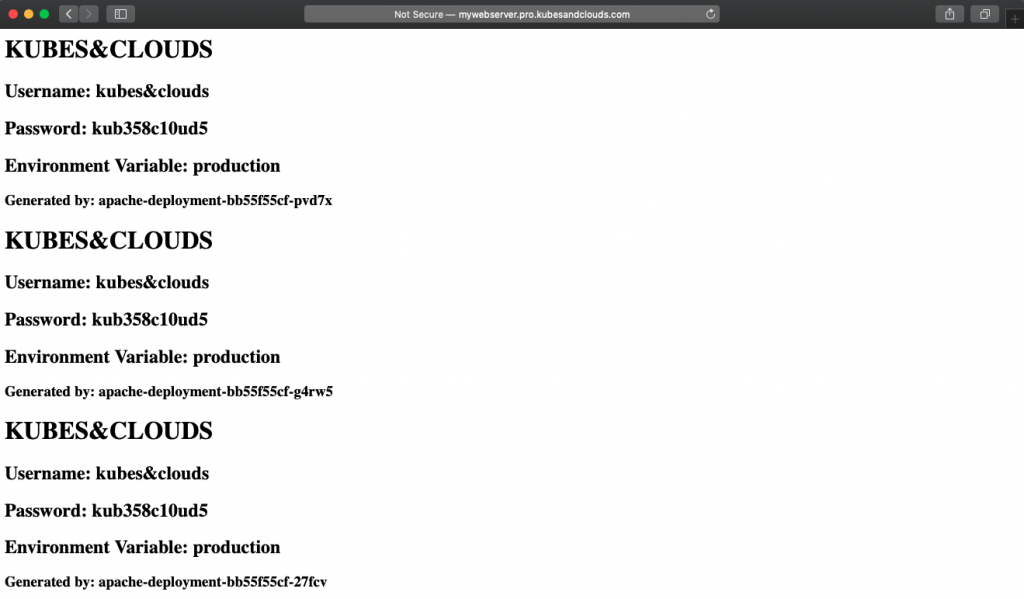
Now, by using the DNS names, you can reach the applications, each one deployed in a different namespace and using different configurations, as you can see in the images below. Each pod in the deployment generates an entry in the index page of the web server. Since each environment has a different number of replicas, in each environment the index page will have a different number of entries.
Pushing some changes
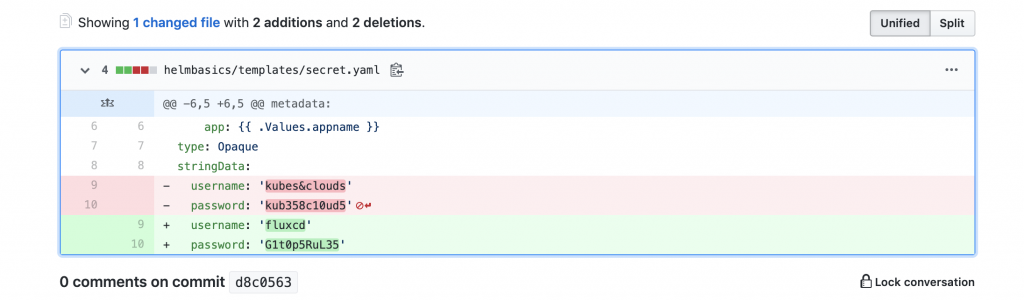
Let’s add some changes in the develop branch of the chart. For example, modify the values of the secret passed to the web server.
You can also add an initContainer to emulate web server’s initial bootup process.

Wait for FluxCD to synchronize the modified elements into the development namespace. If you don’t want to wait, just force the synchronization process using the CLI. Check the newly deployed web server and you will notice three different entries, even though the deployment in the development namespace uses just one pod.
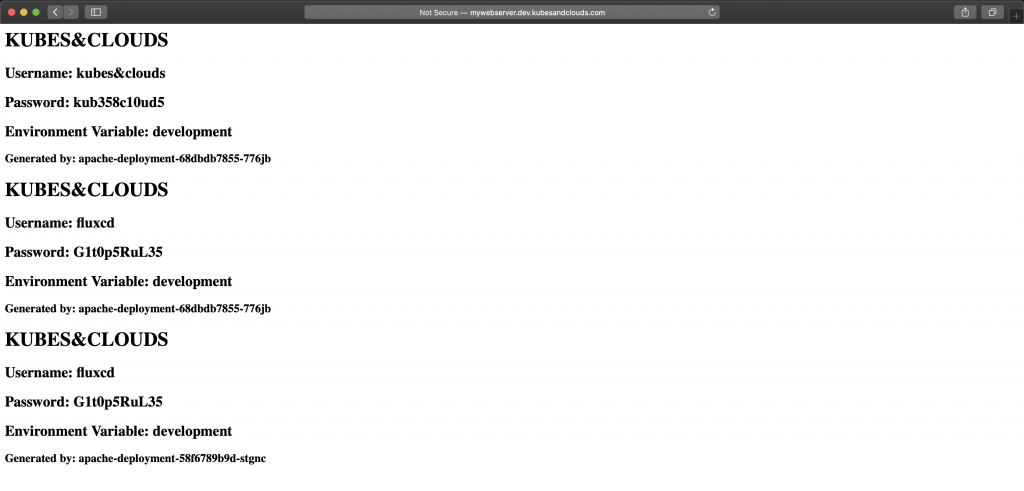
How is this possible? It is a direct consequence of using a persisting volume to store the index page of the web server. Every time the pod is restarted, it writes a new entry into the file. In this case, since we added changes in two different commits FluxCD synchronized the repo two times, redeploying the pod in turn two times.

Images
As commented before, FluxCD is also able to monitor Docker repositories and redeploy the applications and resources that use these images. FluxCD recognizes the annotation filter.fluxcd.io/chart-image, watching the Docker repository for all the images in the chart tagged with values that match the expression defined in the annotation. In this case, if a new image is pushed to the repository with a tag which starts with v, FluxCD will detect it, updating the chart to use the new image, both in the cluster and in the git repository. That’s why we gave FluxCD’s SSH key read and write access to the repository.
apiVersion: helm.fluxcd.io/v1
kind: HelmRelease
metadata:
  name: helmbasic-develop
  namespace: develop
  annotations:
    fluxcd.io/automated: "true"
    filter.fluxcd.io/chart-image: glob:v*
spec:
  releaseName: helmbasic-develop
  chart:
    git: git@github.com:yourname/helmflux
    path: helmbasics
    ref: develop
  values:
    environment: development
    replicaCount: 1
    ingress:
      host: mywebserver.dev.kubesandclouds.com
To reproduce this example, you’re going to need a Docker image repository. My recommendation is to use Dockerhub, you will only need to set up an account and after that you can create your own repository and push images to it. Make sure your repository is set to private. When using a private repository you will need to login first into the Docker registry with you username and password. This guarantees that only you can push images to this repository.
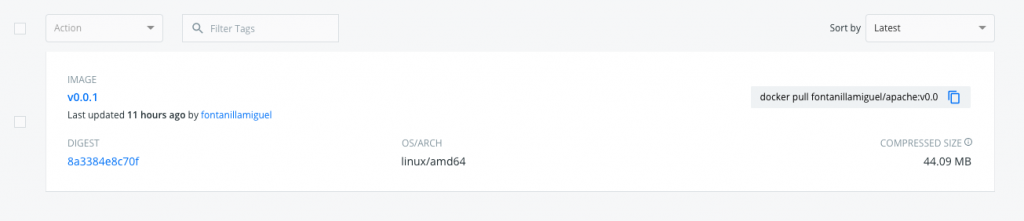
Once the repository is created, you can push the first version of the image. In this case, it is going to be a copy of the original Bitnami’s image with no modifications.
docker pull bitnami/apache:2.4.41-debian-10-r29
docker tag bitnami/apache:2.4.41-debian-10-r29  your-dockerhu-buser/your-reponame:v0.0.1
docker login docker.io
docker push your-dockerhub-user/your-reponame:v0.0.1
After pushing the new image, it will be available in Dockerhub, so now you can modify your chart so that it uses this new image instead of the original Bitnami’s image.
However, before modifying the code and triggering FluxCD’s synchronization, you have to ensure that your cluster has access to your private repository. How to do so? You just need to create a docker-registry Kubernetes secret with your credentials in the develop namespace and add them to the default service account in that namespace. The Docker daemon powering the nodes in the cluster will use this credentials to log into the Docker registry and pull the images.
kubectl create secret docker-registry regcred --docker-server=https://index.docker.io/v1/  --docker-username=<your-name> --docker-password=<your-pword>  -n develop
kubectl patch serviceaccount default -p '{"imagePullSecrets": [{"name": "regcred"}]}' -n develop
Flux needs to know about this secret, so that it can access the registry to watch for new images. By issuing the command below, FluxCD deployment is updated with the secret name.
helm upgrade -i flux fluxcd/flux --wait --namespace fluxcd --set git.url=git@github.com:yourusername/helmflux --set image.pullSecret=regcred
Now you can modify the image to use in the HelmRelease file of the development environment in the master branch.
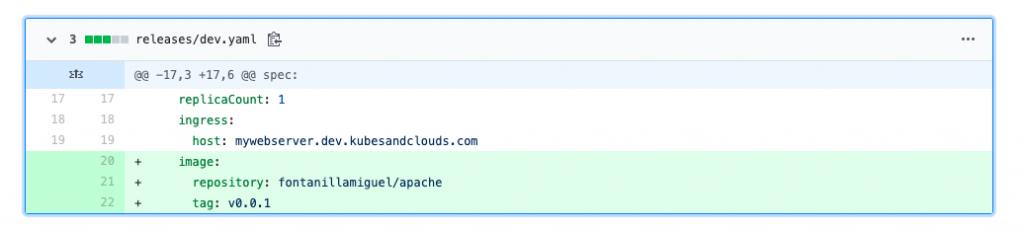
Thus, the final version of your HelmRelease for the develop environment should be something similar to the snippet below.
apiVersion: helm.fluxcd.io/v1
kind: HelmRelease
metadata:
  name: helmbasic-develop
  namespace: develop
  annotations:
    fluxcd.io/automated: "true"
    filter.fluxcd.io/chart-image: glob:v*
spec:
  releaseName: helmbasic-develop
  chart:
    git: git@github.com:yourname/helmflux
    path: helmbasics
    ref: develop
  values:
    environment: development
    replicaCount: 1
    ingress:
      host: mywebserver.dev.kubesandclouds.com
    image:
      repository: your-dockerhub-user/your-reponame
      tag: v0.0.1
As before, wait some minutes until FluxCD detects the changes and redeploys the pod in the development environment. As you can see, the deployment is using the new image now.

TIP: By using the jsonpath Kubernetes ouput you can retrieve the parameters you want in the specific format and order that you may need. It is a little bit trickier than using the classic kubectl get pods, but it is a really powerful and flexible option.
kubectl get pods <your-apache-podname> -n develop -o jsonpath='{ range .spec.containers[*]}{.image}{"\n"}'
Finally, you can create a new version of the image. Let’s say you need to add the tree command to better inspect the contents of the container. To do so, you can use the Dockerfile below.
FROM your-dockerhub-user/your-reponame:v0.0.1
CMD yum update && yum install tree -y
Build the new Docker image and push it to your Docker registry so that FluxCD does the dirty job.
docker build . -t your-dockerhub-user/your-reponame:v0.0.2
docker push your-dockerhub-user/your-reponame:v0.0.2
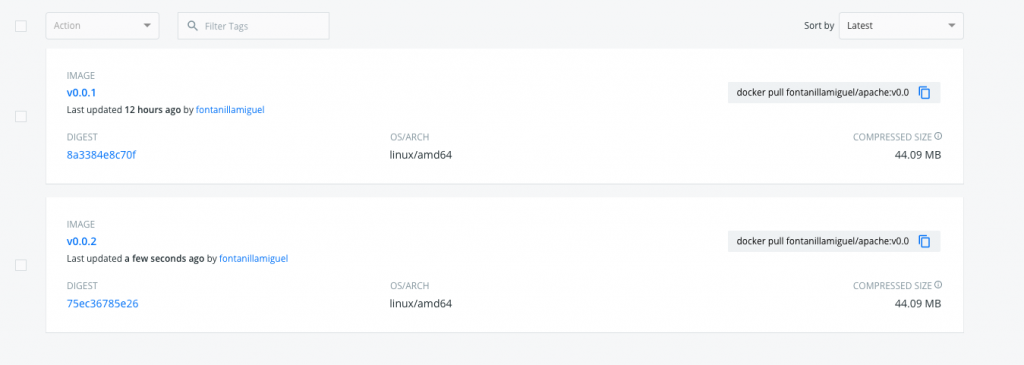
Wait some minutes until the FluxCD operator detects the new image, and you will see how the deployment was updated with the v0.0.2 image.

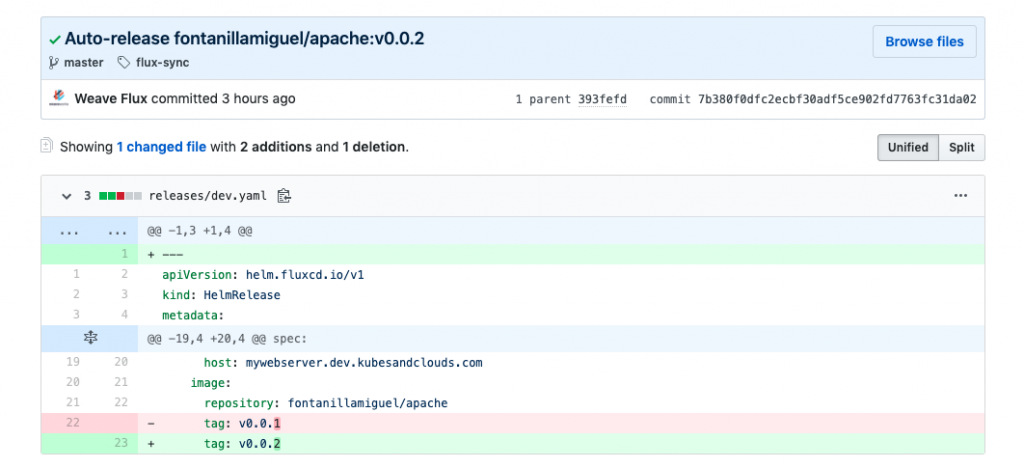
Besides, FluxCD automatically modified the image tag in the development HelmRelease and committed the changes indicating that it was an ‘auto-release’.
Cleaning this mess up 🧹
Once you have finished with this practical example, clean your cluster up by issuing the following commands. If you’re using either Minikube or Docker desktop you can also reset the cluster.
kubectl delete hr helmbasic-develop -n develop
kubectl delete hr helmbasic-staging -n staging
kubectl delete hr  helmbasic-production -n production
kubectl delete hr nginx-ingress -n ingress
kubectl delete -f https://raw.githubusercontent.com/fluxcd/helm-operator/master/deploy/crds.yaml
helm delete helmbasic-develop -n develop
helm delete helmbasic-staging -n staging
helm delete helmbasic-production -n production
helm delete nginx-ingress -n ingress
helm delete flux -n fluxcd
helm delete helm-operator -n fluxcd
kubectl delete namespaces develop staging ingress production
Conclusion
In this post, FluxCD was introduced as continuous deployment tool and as a GitOps enabler.
This tool helps automating Kubernetes deployments, as well as ensuring that what is running in the cluster matches the content of your git repository. Besides, it offers the possibility to trigger synchronization when new images matching specific criteria are built, a feature ideal for automated CI/CD environments.
In comparison with the first tool reviewed in the set of GitOps articles: ArgoCD, FluxCD offers a more developer-like and decentralized way of managing deployments following the GitOps philosophy. It is managed programmatically by means of its CLI and the custom resources in the cluster. FluxCD doesn’t offer a web interface or an API server to interact with. ArgoCD does it, and it also offers more detailed drift detection features, as well as self-healing capabilities but it also increases its complexity as a tool.
Keep in mind that FluxCD uses a single git repository to handle all the releases in the cluster, whereas ArgoCD can use different repositories. If you needed a similar behavior using FluxCD, you may consider using git submodules.
FluxCD offers a lot of extra interesting features to fine tune synchronization and image releases. If you want to know more about it, read the docs.