Getting the size of a Kubernetes cluster right is not an easy task, if the number of nodes provisioned is too high, resources might be underutilized and if it’s too low, new workloads won’t be able to be scheduled in the cluster.
Setting the number of nodes manually is a simple approach, but it requires manual intervention every time the cluster needs to grow or to shrink, and it will make nearly impossible to adapt the cluster size to cover rapid traffic and load fluctuations. In order to solve this problem, the Cluster Autoscaler was introduced starting on Kubernetes v1.4.
Around 4 years after the introduction of the Cluster Autoscaler, AWS started working on a new-generation Cluster Autoscaler: Karpenter. This article covers the fundamental differences between Cluster Autoscaler and Karpenter, followed by a demo that scales up an identical production-like cluster for a sample workload with 100 replicas.
This is also the first collaborative article in Kubes&Clouds, where the main contributor is my colleague at sennder and friend Virendra Bhalothia. He is a seasoned professional, who shares my passion for technology and knowledge sharing. You can check his own blog here!

AWS Announcement at re:Invent 2021 🟠☁️
Karpenter is an open-source, flexible, high-performance Kubernetes cluster autoscaler built by AWS, that was released (GA version) at re:Invent 2021.
This means it’s officially ready for production workloads as per AWS. However, it’s been discussed for almost a year. Some of the conference talks can be found on the Karpenter’s Github repo.
The official blog announcement promises support for K8s clusters running in any environment. However, it currently only supports AWS as cloud provider, but do keep an eye on the Karpenter project roadmap if you use other underlying cloud providers or on-premises datacenters.
Kubernetes Autoscaling Capabilities ☸️ 🎛️
Alright! So, before we get started with comparing Cluster Autoscaler with Karpenter let’s quickly go over the autoscaling capabilities Kubernetes offers. Kubernetes enables autoscaling at the node level as well as at the pod level. These two are different but fundamentally connected layers of Kubernetes architecture.
Pod-based autoscaling
- Horizontal Pod Autoscaler – adds or removes more pods to the deployment as needed
- Vertical Pod Autoscaler – resizes pod’s CPU and memory requests and limits to match the load
Node-based autoscaling: adding or removing nodes as needed
NOTE: This post will only explore the node-based Kubernetes Autoscalers.
Cluster Autoscaler vs Karpenter ⚒️🤖
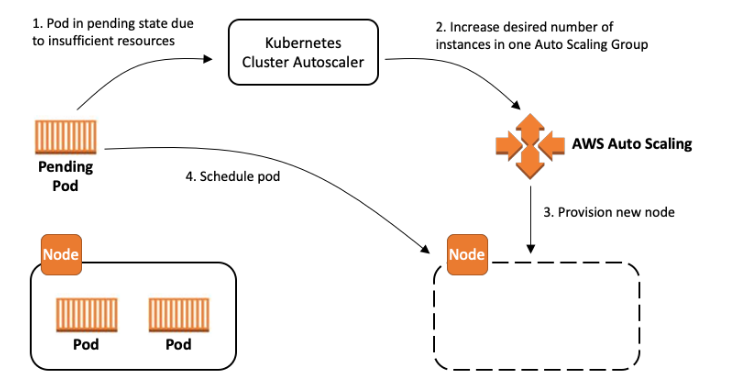
Cluster Autoscaler is a Kubernetes tool that increases or decreases the size of a Kubernetes cluster (by adding or removing nodes), based on the presence of pending pods and node utilization metrics.
It automatically adjusts the size of the Kubernetes cluster when one of the following conditions is true:
- There are pods that failed to run in the cluster due to insufficient resources
- There are nodes in the cluster that have been underutilized for an extended period of time and their pods can be placed on other existing nodes
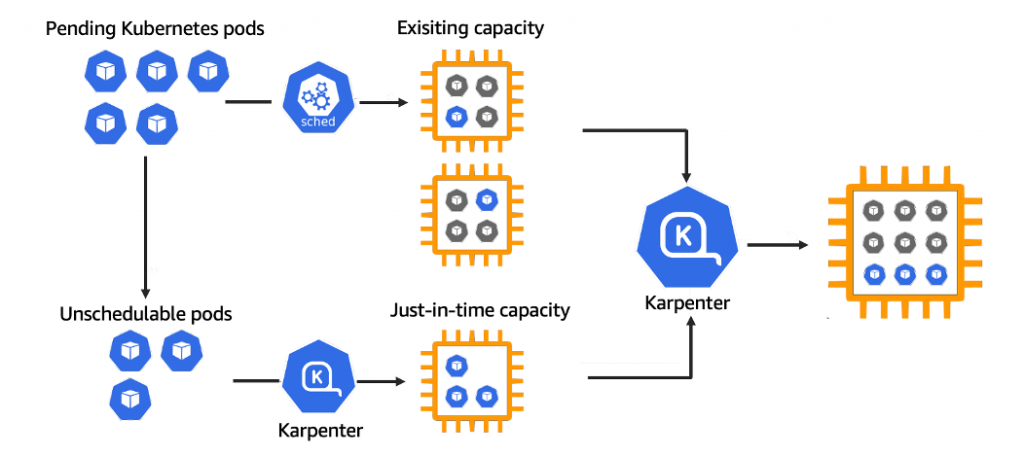
Karpenter automatically provisions new nodes in response to unschedulable pods. Karpenter does this by observing events within the Kubernetes cluster, and then sending commands to the underlying cloud provider.
Karpenter works by:
- Watching for pods that the Kubernetes scheduler has marked as unschedulable
- Evaluating scheduling constraints (resource requests, nodeselectors, affinities, tolerations, and topology spread constraints) requested by the pods
- Provisioning nodes that meet the requirements of the pods
- Scheduling the pods to run on the new nodes and removing the nodes when the nodes are no longer needed
Karpenter has two control loops that maximize the availability and efficiency of your cluster.
- Allocator – fast-acting controller ensuring that pods are scheduled as quickly as possible
- Reallocator – slow-acting controller replaces nodes as pods capacity shifts over time
Architecture 🏗️
Cluster Autoscaler watches for pods that fail to schedule and for nodes that are underutilized. It then simulates the addition or removal of nodes before applying the change to your cluster.
The AWS Cloud Provider implementation within Cluster Autoscaler controls the DesiredReplicas field of your EC2 Auto Scaling Groups. The Kubernetes Cluster Autoscaler automatically adjusts the number of nodes in your cluster when pods fail or are rescheduled onto other nodes. The Cluster Autoscaler is typically installed as a Deployment in your cluster. It uses a leader election algorithm to ensure high availability, but scaling is done by only one replica at a time.
On the other hand, Karpenter works in tandem with the Kubernetes scheduler by observing incoming pods over the lifetime of the cluster. It launches or terminates nodes to maximize application availability and cluster utilization. When there is enough capacity in the cluster, the Kubernetes scheduler will place incoming pods as usual.
When pods are launched that cannot be scheduled using the existing capacity of the cluster, Karpenter bypasses the Kubernetes scheduler and works directly with your provider’s compute service, (for example, AWS EC2), to launch the minimal compute resources needed to fit those pods and binds the pods to the nodes provisioned. As pods are removed or rescheduled to other nodes, Karpenter looks for opportunities to terminate under-utilized nodes.
Detailed Kubernetes Autoscaling guidelines from AWS can be found here.
Karpenter improvements
- Designed to handle the full flexibility of the cloud: Karpenter has the ability to efficiently address the full range of instance types available through AWS. Cluster autoscaler was not originally built with the flexibility to handle hundreds of instance types, zones, and purchase options.
- Group-less node provisioning: Karpenter manages each instance directly, without using additional orchestration mechanisms like node groups. This enables it to retry in milliseconds instead of minutes when capacity is unavailable. It also allows Karpenter to leverage diverse instance types, availability zones, and purchase options without the creation of hundreds of node groups.
- Scheduling enforcement: Cluster autoscaler doesn’t bind pods to the nodes it creates. Instead, it relies on the kube-scheduler to make the same scheduling decision after the node has come online. A node that Karpenter launches has its pods bound immediately. The kubelet doesn’t have to wait for the scheduler or for the node to become ready. It can start preparing the container runtime immediately, including pre-pulling the image. This can shave seconds off of node startup latency.
Implementing it ➡️ ⚒️
In this section, we will create the required IAM & K8s resources for Karpenter using Terraform and Helm. Once we are all set up then we will give it a go and check how quickly Karpenter scales up your cluster as compared to the Cluster Autoscaler.
Make sure the following tools are installed in your local environment before proceeding:
We are assuming that the underlying VPC and network resources are already created along with the EKS cluster as well as the Cluster Autoscaler, and we will add Karpenter resources on top of that. In case you haven’t created them, you can check this Terraform code, from a webinar in which I participated. For the Cluster Autoscaler, you can find its installation guide for EKS here.
NOTE: Please note that Karpenter expects the subnets to be tagged with “kubernetes.io/cluster/<cluster-name>” = “owned“.
If you are using Terraform then it’s as simple as adding this one line in your VPC module.
module "vpc" {
  source = "terraform-aws-modules/vpc/aws"
  ...
  private_subnet_tags = {
    "kubernetes.io/cluster/<your-cluster-name-here>" = "owned"
  }
  ...
}
Configure the KarpenterNode IAM Role
The first step will be to create a karpenter.tf file in your terraform directory to add the snippet below.
The EKS module creates an IAM role for worker nodes. We’ll use that for Karpenter (so we don’t have to reconfigure the aws-auth ConfigMap), but we need to add one more policy and create an instance profile.
data "aws_iam_policy" "ssm_managed_instance" {
  arn = "arn:aws:iam::aws:policy/AmazonSSMManagedInstanceCore"
}

resource "aws_iam_role_policy_attachment" "karpenter_ssm_policy" {
  role       = module.eks.worker_iam_role_name
  policy_arn = data.aws_iam_policy.ssm_managed_instance.arn
}

resource "aws_iam_instance_profile" "karpenter" {
  name = "KarpenterNodeInstanceProfile-<your-cluster-name>"
  role = module.eks.worker_iam_role_name
}
Now, Karpenter can use this instance profile to launch new EC2 instances and those instances will be able to connect to your cluster.
Configure the KarpenterController IAM Role
Karpenter requires permissions for launching instances, which means it needs an IAM role that is granted that access. The config below will create an AWS IAM Role, attach a policy, and authorize the Service Account to assume the role using IRSA using an AWS terraform module. We will create the ServiceAccount and connect it to this role during the Helm chart installation.
module "iam_assumable_role_karpenter" {
  source                        = "terraform-aws-modules/iam/aws//modules/iam-assumable-role-with-oidc"
  version                       = "4.7.0"
  create_role                   = true
  role_name                     = "karpenter-controller-<your-cluster-name>"
  provider_url                  = module.eks.cluster_oidc_issuer_url
  oidc_fully_qualified_subjects = ["system:serviceaccount:karpenter:karpenter"]
}

resource "aws_iam_role_policy" "karpenter_contoller" {
  name = "karpenter-policy-<your-cluster-name>"
  role = module.iam_assumable_role_karpenter.iam_role_name

  policy = jsonencode({
    Version = "2012-10-17"
    Statement = [
      {
        Action = [
          "ec2:CreateLaunchTemplate",
          "ec2:CreateFleet",
          "ec2:RunInstances",
          "ec2:CreateTags",
          "iam:PassRole",
          "ec2:TerminateInstances",
          "ec2:DescribeLaunchTemplates",
          "ec2:DescribeInstances",
          "ec2:DescribeSecurityGroups",
          "ec2:DescribeSubnets",
          "ec2:DescribeInstanceTypes",
          "ec2:DescribeInstanceTypeOfferings",
          "ec2:DescribeAvailabilityZones",
          "ssm:GetParameter"
        ]
        Effect   = "Allow"
        Resource = "*"
      },
    ]
  })
}
Install Karpenter Helm Chart
Now you can use Helm to deploy Karpenter to the cluster. While installing the chart, we will override some of the default values with the cluster specific values, so that Karpenter can work properly in our cluster. In this case, an in-line call to the AWS CLI is used to retrieve the cluster endpoint.
>~ helm repo add karpenter https://charts.karpenter.sh
~ helm repo update
~ helm upgrade --install karpenter karpenter/karpenter --namespace karpenter \
--create-namespace --set serviceAccount.create=true --version 0.5.3 \
--set serviceAccount.annotations.eks\\.amazonaws\\.com/role-arn=${IAM_ROLE_ARN} \
--set controller.clusterName=${CLUSTER_NAME} \
--set controller.clusterEndpoint=$(aws eks describe-cluster --name ${CLUSTER_NAME} --region ${REGION} --profile ${AWS_PROFILE} --query "cluster.endpoint" --output json) --wait
This should create the following resources in the karpenter namespace.
~ kubectl get all
NAME                                        READY   STATUS    RESTARTS   AGE
pod/karpenter-controller-64754574df-gqn86   1/1     Running   0          29s
pod/karpenter-webhook-7b88b965bc-jcvhg      1/1     Running   0          29s

NAME                        TYPE        CLUSTER-IP      EXTERNAL-IP   PORT(S)    AGE
service/karpenter-metrics   ClusterIP   10.x.x.x           none       8080/TCP   29s
service/karpenter-webhook   ClusterIP   10.x.x.x           none        443/TCP    29s

NAME                                   READY   UP-TO-DATE   AVAILABLE   AGE
deployment.apps/karpenter-controller   1/1     1            1           30s
deployment.apps/karpenter-webhook      1/1     1            1           30s

NAME                                              DESIRED   CURRENT   READY   AGE
replicaset.apps/karpenter-controller-64754574df   1         1         1       30s
replicaset.apps/karpenter-webhook-7b88b965bc      1         1         1       30s
Also, it should create a Service Account.
~ kubectl describe sa karpenter -n karpenter
Name:                karpenter
Namespace:           karpenter
Labels:              app.kubernetes.io/managed-by=Helm
Annotations:         eks.amazonaws.com/role-arn: <Obfuscated_IAM_Role_ARN>
                     meta.helm.sh/release-name: karpenter
                     meta.helm.sh/release-namespace: karpenter
Image pull secrets:  image-pull-secret
Mountable secrets:   karpenter-token-dwwrs
Tokens:              karpenter-token-dwwrs
Events:              <none>
Configure a Karpenter Provisioner
A single Karpenter provisioner is capable of handling many different pod types. Karpenter makes scheduling and provisioning decisions based on pod attributes such as labels and affinity. In other words, Karpenter eliminates the need to manage many different node groups.
Create a default provisioner using the command below. This provisioner configures instances to connect to your cluster’s endpoint and discovers resources like subnets and security groups using the cluster’s name.
cat <<EOF | kubectl apply -f -
apiVersion: karpenter.sh/v1alpha5
kind: Provisioner
metadata:
  name: default
spec:
  requirements:
    - key: karpenter.sh/capacity-type
      operator: In
      values: ["spot"]
  limits:
    resources:
      cpu: 1000
  provider:
    instanceProfile: KarpenterNodeInstanceProfile-${CLUSTER_NAME}
  ttlSecondsAfterEmpty: 30
EOF
The ttlSecondsAfterEmpty value configures Karpenter to terminate empty nodes. This behavior can be disabled by leaving the value undefined.
Review the provisioner CRD for more information. For example, ttlSecondsUntilExpired configures Karpenter to terminate nodes when a maximum age is reached.
Alright, so now we have a Karpenter provisioner that supports Spot capacity type. In a real-world scenario, you might have to manage a variety of Karpenter provisioners that can support your workloads.
Testing it 🧪🔥
Now, all what is left to do is to deploy a sample app and see how it scales via Cluster Autoscaler and Karpenter respectively. To do so, you can execute the following command.
kubectl create deployment inflate --image=public.ecr.aws/eks-distro/kubernetes/pause:3.2
Also, let’s set some resource requests for this vanilla inflate deployment:
kubectl set resources deployment inflate --requests=cpu=100m,memory=256Mi
Cluster Autoscaler
It is important to scale down the Karpenter deployment to 0 replicas before increasing the number of inlflate replicas, so that Cluster Autoscaler handles the addition of new nodes.
kubectl scale deployment karpenter-controller -n karpenter --replicas=0
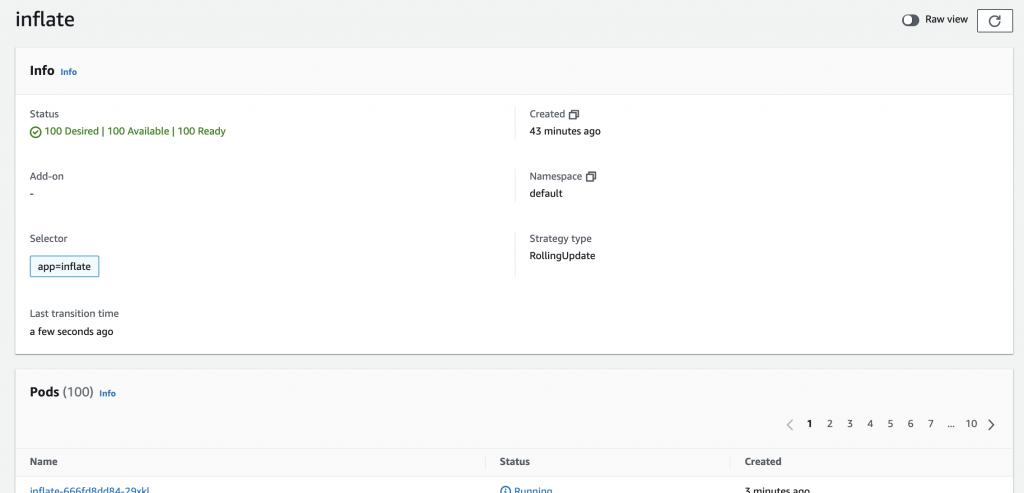
Now, let’s scale the inflate deployment up to 100 replicas. Please note this may incur costs to your AWS cloud bill, so be careful.
kubectl scale deployment inflate --replicas 100
Cluster Autoscaler works with node groups in order to scale out or in as per the dynamic workloads. In order to get efficient autoscaling with Cluster Autoscaler, there are a lot of considerations that need to be reviewed and applied accordingly to the requirements. You can find more details about this topic here. This demo was run on a test cluster that had an ASG with identical instance specifications with the instance type c5.large.
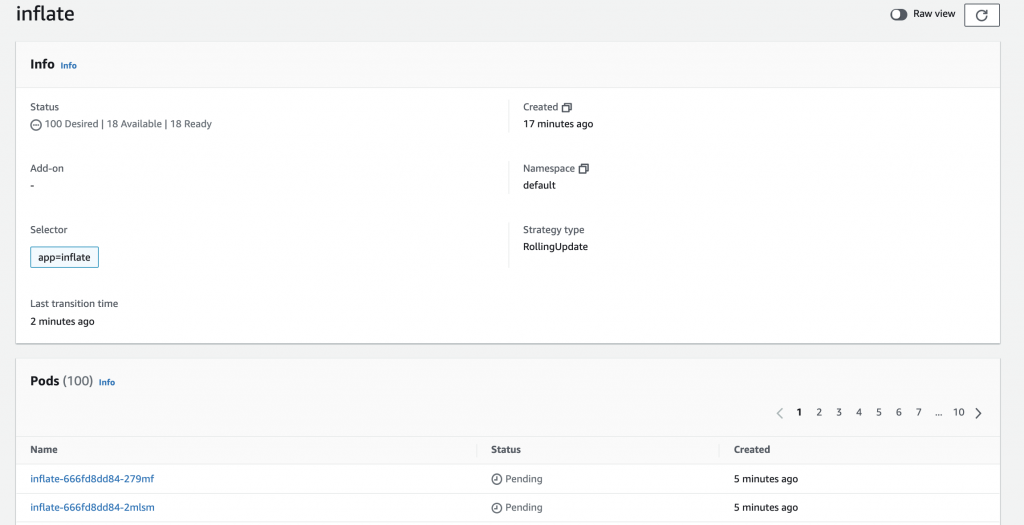
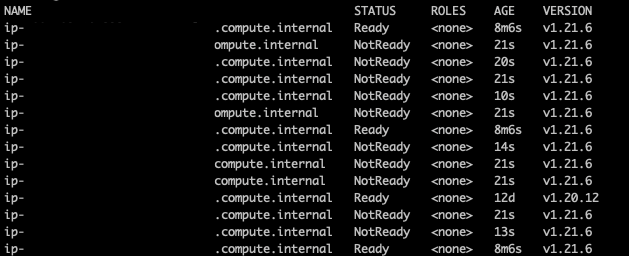
The inflate deployment kept on waiting for the Cluster Autoscaler to schedule all the pods for around 4 minutes. If you execute kubectl get nodes during the scaling process, you will see the new nodes kicking in.
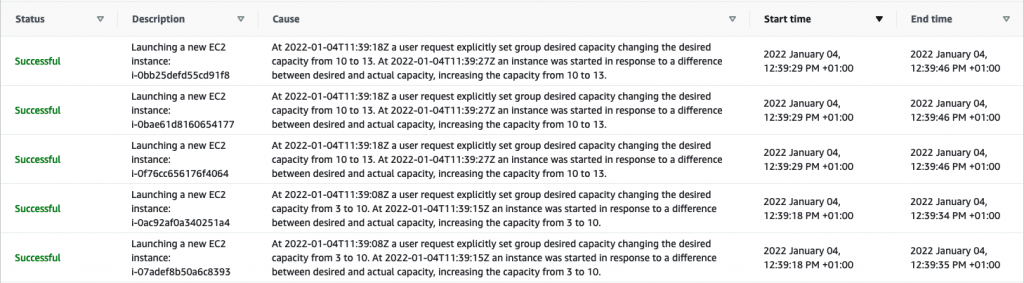
As commented before, Cluster Autoscaler operates on the autoscaling groups. You can see how the number of instances of the targeted autoscaling group is increased using the AWS console.

It’s also possible to check the autoscaling events in the console. These events were triggered by the Cluster Autoscaler, calling the EC2 API.
Finally, let’s scale down the inflate deployment back to one replica.
kubectl scale deployment inflate --replicas 1</code></pre>
In my case, it took the Cluster Autoscaler 6 minutes to trigger a downscaling event and start reducing the cluster size. You can check the logs of the Cluster Autoscaler to see how the autoscaling process happens.
Karpenter
Let’s repeat the experiment now, but using Karpenter this time. To do so, scale down your Cluster Autoscaler and scale up the Karpenter Controller.
kubectl scale deployment cluster-autoscaler -n autoscaler --replicas=0
kubectl scale deployment karpenter-controller -n karpenter --replicas=1
Now that Karpenter is taking care of the autoscaling of the cluster, scale the inflate deployment to 100 replicas again and monitor the logs of the Karpenter controller.
kubectl scale deployment inflate --replicas 100
The following snippet contains part of the karpenter-controller logs after the deployment was scaled up. It’s using the default provisioner that was defined in the previous version, and it has a wide ranges of instances to select from, as we did not specify any specific instance type in the provisioner.
2021-12-28T14:23:58.816Z INFO controller.provisioning Batched 89 pods in 4.587455594s {"commit": "5047f3c", "provisioner": "default"}

2021-12-28T14:23:58.916Z INFO controller.provisioning Computed packing of 1 node(s) for 89 pod(s) with instance type option(s) [m5zn.3xlarge c3.4xlarge c4.4xlarge c5ad.4xlarge c5a.4xlarge c5.4xlarge c5d.4xlarge c5n.4xlarge m5ad.4xlarge m5n.4xlarge m5.4xlarge m5a.4xlarge m6i.4xlarge m5d.4xlarge m5dn.4xlarge m4.4xlarge r3.4xlarge r4.4xlarge r5b.4xlarge r5d.4xlarge] {"commit": "5047f3c", "provisioner": "default"}

2021-12-28T14:24:01.013Z INFO controller.provisioning Launched instance: i-xx, hostname: ip-10-x-x-x.eu-x-1.compute.internal, type: c5.4xlarge, zone: eu-x-c, capacityType: spot {"commit": "5047f3c", "provisioner": "default"}

2021-12-28T14:24:01.222Z INFO controller.provisioning Bound 89 pod(s) to node ip-10-x-x-x.eu-x-1.compute.internal {"commit": "5047f3c", "provisioner": "default"}

2021-12-28T14:24:01.222Z INFO controller.provisioning Waiting for unschedulable pods {"commit": "5047f3c", "provisioner": "default"}
As you can see in the log above, Karpenter binds the pods to the newly provisoned node, but how is it done? If you check any of the pod’s definition for the inflate deployment, you will notice that the nodeName field points to the new node.
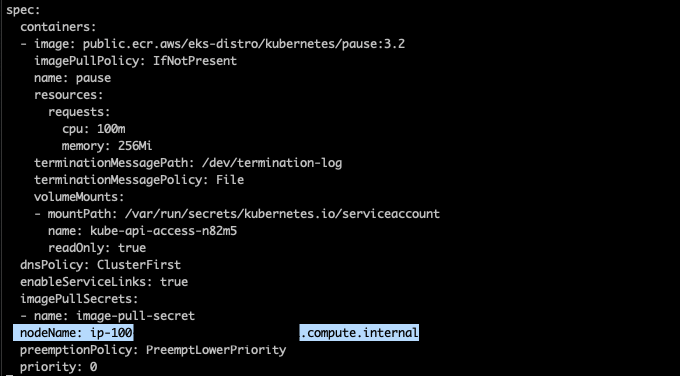
The instance provisioned is not a part of an autoscaling group, and in this case it’s a spot c5.4xlarge instance. The instance type was selected by Karpenter internal algorithm, but you can customize the provisioner to use the instance types that better suit your needs with the node.kubernetes.io/instance-type directive . Check the provisioner API to get more information about how to customize your provisioners.

So, basically, Karpenter detects there are some unschedulable pods in the cluster. It does the math and provisions the best-suited spot instance from the available options. It took around 2 minutes for the inflate deployment with 100 replicas to be fully deployed.
Finally, let’s wrap it up by scaling down the deployment to 0 replicas.
kubectl scale deployment inflate --replicas 0
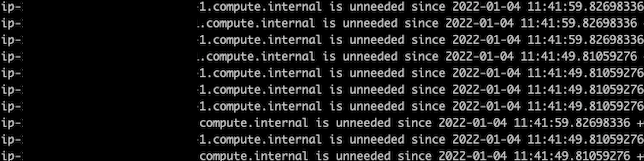
If you check the logs, you will see how Karpenter deprovisions the instance right away.
2021-12-28T14:31:12.364Z INFO controller.node Added TTL to empty node {"commit": "5047f3c", "node": "ip-10-x-x-x.eu-x-1.compute.internal"}

2021-12-28T14:31:42.391Z INFO controller.node Triggering termination after 30s for empty node {"commit": "5047f3c", "node": "ip-10-x-x-x.eu-x-1.compute.internal"}

2021-12-28T14:31:42.418Z INFO controller.termination Cordoned node {"commit": "5047f3c", "node": "ip-10-x-x-x.eu-x-1.compute.internal"}

2021-12-28T14:31:42.620Z INFO controller.termination Deleted node {"commit": "5047f3c", "node": "ip-10-x-x-x.eu-x-1.compute.internal"}
It took 30 seconds for Karpenter to terminate the node once there was no pod scheduled on it.
Conclusion 📖🧑🏫
The Karpenter project is exciting and breaks away from the old school Cluster Autoscaler way of doing things. It is very efficient and fast but not as much battle-tested as the ‘good old’ Cluster Autoscaler.
Please note that the above experiment with Cluster Autoscaler could be greatly improved if we set up the right instance types and autoscaling policies. However, that’s the whole point of this comparison: with Karpenter you don’t have to ensure all of these configurations beforehand. You might end up having a lot of provisioners for your different workloads but that will be covered in upcoming posts for this series.
If you are running Kubernetes then I’m sure you will enjoy spinning it up and playing around with it. Good luck!
Next Steps 👩💻👨💻
Karpenter is an open source project with a roadmap open to all, so it’s definitely worth keeping an eye out on it, as well as on the issues that people might face.
As an extension to this experiment, we will be writing an article based on the experience of migrating a production grade cluster from Cluster Autoscaler to Karpenter, as well as in-depth performance comparison article, so expect more cool stuff on this series!