Infrastructure as Code (IaC) is one of the biggest revolutions in the cloud computing landscape, as it allows automating the deployment of infrastructure based on its definition in the source code. Using code as the source of truth for infrastructure has several benefits:
- Infrastructure can be versioned as source code normally is, increasing the traceability of the infrastructure deployed.
- Deployments, rollbacks and disaster recovery procedures can be easily automated, reducing the amount of human intervention, thus reducing the likelihood of errors.
- Costs are reduced, as resources can be easily resized to adapt them to the load fluctuations and environments can be switched off when they are not needed.
- Deployment processes are sped up significantly, making the software development lifecycle more efficient, as environments can be deployed when needed.
IaC by SourceFuse
IaC can be implemented by means of several tools, being Terraform, AWS CloudFormation, Ansible, Chef or Puppet some of the most widely used ones. These tools normally rely on declarative languages (or dialects) using mostly YAML, JSON and JSON-like formatting for the infrastructure definition. Getting to work with these languages and tools can be challenging sometimes, specially for those with a more ‘Developer-like’ background.
Thus, it makes sense to deploy infrastructure using high-level languages, which are more natural to developers. This approach can increase productivity based on the fact that common development patterns can be easily reused. This way of working, enables developers to provision infrastructure easily, without needing to be an infrastructure expert. Besides, developers can provision a complete stack, applications and the underlying infrastructure, by using high-level languages in their IDE of choice. This is particularly useful in medium size and small companies and projects, where just one team is in charge of the management and operation of both the Dev and Ops parts.
In this post, the AWS Cloud Development Kit (CDK) will be reviewed. AWS CDK is a development framework created by AWS, which helps creating and managing cloud infrastructure and applications by using well-known programming languages such as Typescript, Javascript, Python, Java and C#. The following examples were developed using Typescript, but in the future, new posts will be released, testing some other languages. You can find the code used to create the examples that are shown on this post in this repository.
Setting the CDK up
In order to use the AWS CDK with Typescript, Node.js is needed. You can get the appropriate version for your OS in this link. Besides, the AWS CLI can be a useful tool to configure the AWS credentials in your computer. You can get the AWS CLI here. Finally, Typescript itself needs to be installed if it’s not present in your machine. You can get it installed using the Node Package Manager (npm).
npm install -g typescript
The next step is to install the AWS CDK toolkit with npm.
npm install -g aws-cdk
Finally, you can create a Typescript project by issuing the commands below. The cdk init command generates the directory structure, classes, subfolders and installs the core module alongside its dependencies. However, you can download the project we will be using from this this repository. So there’s no need to create a new project from scratch.
# remember not to execute these  commands if you use the example repository
mkdir typescript
cd typescript
cdk init sample-app --language typescript
Project structure
In order to deploy a test stack you can clone the examples repository. You will need to be working from the typescript directory. Running npm install will fetch all the required modules and dependencies for the stack to work.
git clone https://github.com/mifonpe/cdk-web
cd cdk-web/typescript
npm install
After initializing or cloning the project, your folder will contain several directories where the example base code and modules are placed.
- lib is the directory where the infrastructure stack is defined. typescript-stack.ts is the main stack file, where the components will be defined. This file will generate the javascript output typescript-stack.js by means of the transpiler.
- bin contains the entrypoints (both for Javascript and Typescript) for the CDK application. The entrypoints reference the main stack to use.
- package.json contains the npm module manifest
- node_modules contain the dependencies needed by the stack
- cdk.json and tsconfig.json are the CDK toolkit and Typescript configuration files respectively

Deploying the stack
When working with the Typescript stack, it is possible to run the compiler in watch mode, which will automatically compile the changes in the Typescript files into Javascript files. To do so, run the following command in a separate terminal. Otherwise, you will be in charge of compiling each change by hand.
npm run watch
The code below shows the contents of the lib/typescript-stack.ts file. It creates an EC2 instance and configures it to run a simple kubes&clouds static website using an user data script as bootstrap script. Besides, it defines a VPC with a public subnet to launch the instance on, as well as the required Security Groups to enable both HTTP and SSH access to the instance. Notice that a SSH key is specified to access the instance, so, set it to the name of one of the SSH keys existing in your account if you want to access the instance.
import * as cdk from '@aws-cdk/core';
import * as ec2 from '@aws-cdk/aws-ec2';
import { readFileSync } from 'fs';

export class TypescriptStack extends cdk.Stack {
  constructor(scope: cdk.App, id: string, props?: cdk.StackProps) {
    super(scope, id, props);

    const userdata_file = readFileSync('../install_server.sh', 'utf-8');

    const vpc = new ec2.Vpc(this, 'MyCDK-VPC', {

      cidr: '10.0.0.0/21',
      maxAzs: 3,

      subnetConfiguration: [
        {
          subnetType: ec2.SubnetType.PUBLIC,
          name: 'Public',
          cidrMask: 24,
        },
      ],
    });

    const securityGroup = new ec2.SecurityGroup(this, 'MyCDKSecurityGroup', {
      vpc,
      securityGroupName: "Instance-SG",
      description: 'Allow http access to ec2 instances from anywhere',
      allowAllOutbound: true
    });

    securityGroup.addIngressRule(
      ec2.Peer.anyIpv4(),
      ec2.Port.tcp(80),
      'allow ingress http traffic'
    )
    securityGroup.addIngressRule(
      ec2.Peer.anyIpv4(),
      ec2.Port.tcp(22),
      'allow ingress ssh traffic'
    )

    const linux = new ec2.AmazonLinuxImage({
      generation: ec2.AmazonLinuxGeneration.AMAZON_LINUX_2,
      edition: ec2.AmazonLinuxEdition.STANDARD,
      virtualization: ec2.AmazonLinuxVirt.HVM,
      storage: ec2.AmazonLinuxStorage.GENERAL_PURPOSE,
    });

   // tags?
    const instance =  new ec2.Instance(this, 'MyCDKInstance', {
      vpc,
      machineImage: linux,
      instanceName: 'kubes-clouds-test-ts',
      instanceType: ec2.InstanceType.of(ec2.InstanceClass.T2, ec2.InstanceSize.MICRO),
      securityGroup: securityGroup,
    })
    instance.addUserData( userdata_file );
    instance.instance.addPropertyOverride('KeyName', `cdk-key`);


  }
}
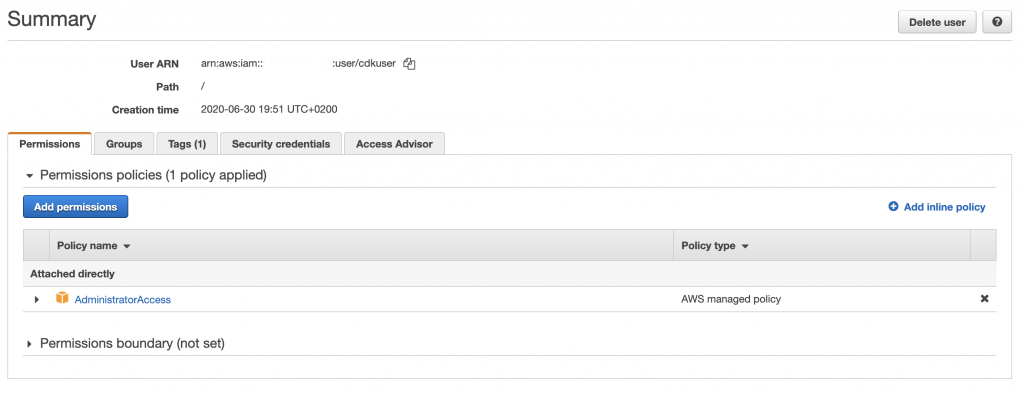
Prior to the deployment, you will need to configure your AWS credentials using the AWS CLI. In order to do so, you will need an AWS secret key and access key pair. If you don’t have one yet, you can create a new one in the AWS IAM console. Check this documentation as a guide.
aws configure
Keep in mind that the user which uses those credentials should have permissions to create the infrastructure specified in the code. For this example you can use the AdministratorAccess managed policy. Store well your credentials, and once this user is no longer needed, remove it, to avoid unnecessary risks.
AWS CDK CLI can be used to generate a CloudFormation stack from the high-level language you are using to define your stack. To do so, issue the following command.
cdk synth
The snippet below, shows a part of the CloudFormation output generated with the cdk synth command.
Resources:
  MyCDKVPC2F0863C1:
    Type: AWS::EC2::VPC
    Properties:
      CidrBlock: 10.0.0.0/21
      EnableDnsHostnames: true
      EnableDnsSupport: true
      InstanceTenancy: default
      Tags:
        - Key: Name
          Value: TypescriptStack/MyCDK-VPC
    Metadata:
      aws:cdk:path: TypescriptStack/MyCDK-VPC/Resource

  . . .

  MyCDKInstance73FDDFF2:
    Type: AWS::EC2::Instance
    Properties:
      AvailabilityZone:
        Fn::Select:
          - 0
          - Fn::GetAZs: ""
      IamInstanceProfile:
        Ref: MyCDKInstanceInstanceProfile467B88F2
      ImageId:
        Ref: SsmParameterValueawsserviceamiamazonlinuxlatestamzn2amihvmx8664gp2C96584B6F00A464EAD1953AFF4B05118Parameter
      InstanceType: t2.micro
      KeyName: cdk-key
      SecurityGroupIds:
        - Fn::GetAtt:
            - MyCDKSecurityGroupE778934F
            - GroupId
      SubnetId:
        Ref: MyCDKVPCPublicSubnet1Subnet1310DAF8
      Tags:
        - Key: Name
          Value: kubes-clouds-test-ts
      UserData:
        Fn::Base64: >-
          #!/bin/bash

          yum update -y

          yum install -y httpd git

          git clone https://github.com/mifonpe/cdk-web

          cp ./cdk-web/web/* /var/www/html/

          usermod -a -G apache ec2-user

          chown -R ec2-user:apache /var/www

          chmod 2775 /var/www

          find /var/www -type d -exec chmod 2775 {} \;

          find /var/www -type f -exec chmod 0664 {} \;

          systemctl start httpd

          systemctl enable httpd
    DependsOn:
      - MyCDKInstanceInstanceRoleA775AF0B
    Metadata:
      aws:cdk:path: TypescriptStack/MyCDKInstance/Resource

  . . .
Prior to your first deployment, you will need to set up the bootstrap stack, which is required by the CDK toolkit in order to to keep track of the deployed resources and templates. The following command carries out the needed setup.
cdk bootstrap
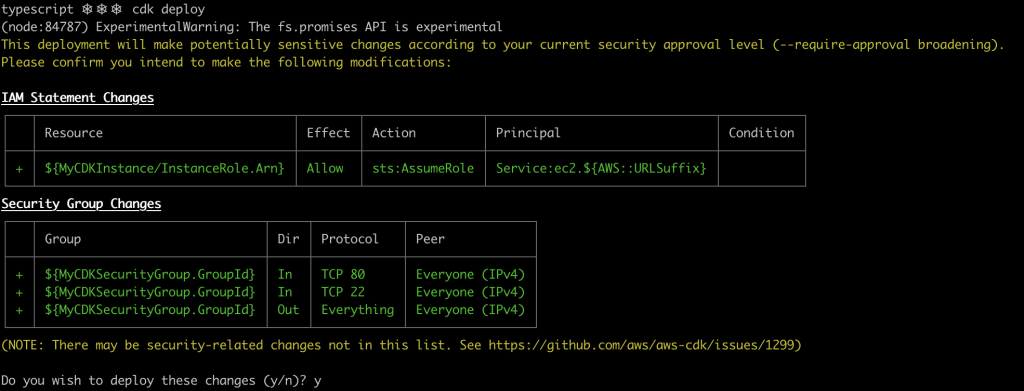
Once the bootstrap procedure is over, everything will be ready to deploy the stack. Issue the following command, and the resources to be created will be prompted, asking for your confirmation. If everything looks good to you confirm your deployment.
cdk deploy
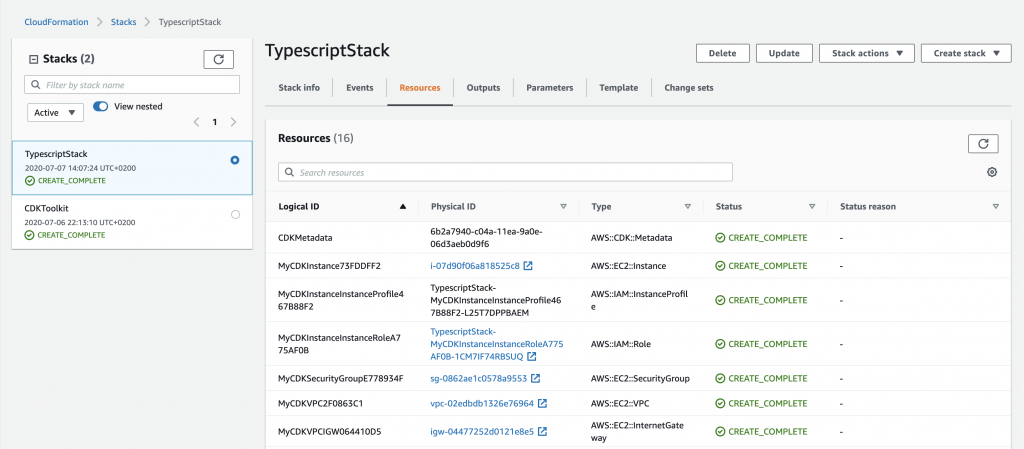
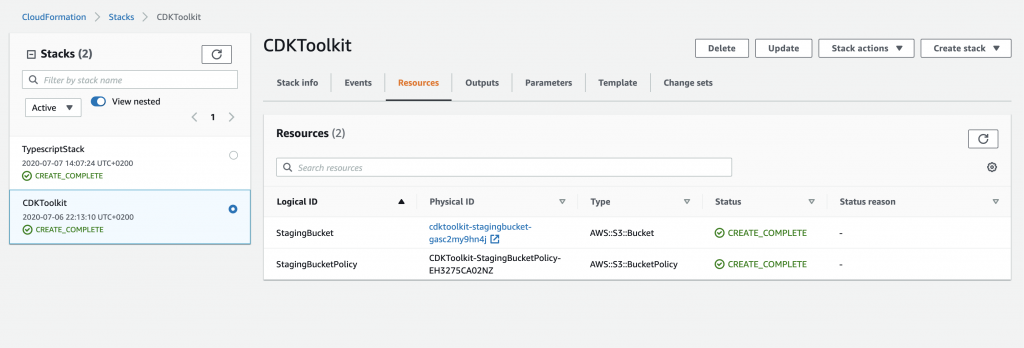
If you inspect the CloudFormation stacks in your account once the deployment has succeeded, you will see the different resources created by AWS CDK.
Furthermore, you will notice an additional stack, the CDK toolkit stack that was created during the bootstrap phase by the CDK CLI. This stack creates an S3 bucket where the resource definitions and states are stored.
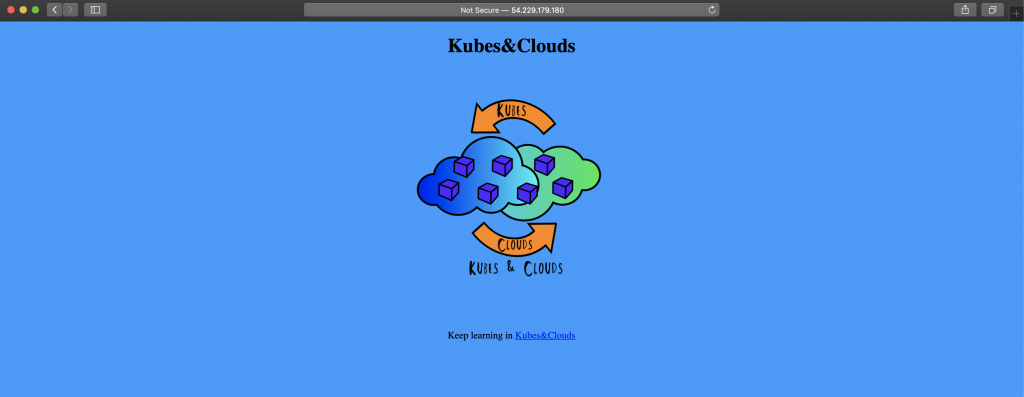
If you access the public IP of the instance that has just been created using your web browser, you will see that it worked as expected!
Once you are done with the web server, destroy the stack and its resources by issuing the following command.
cdk destroy
Terraform equivalent
If you were to deploy the exact same stack using Terraform, you will need something similar to the code below. You can find this file in terraform/main.tf within the example repository. Notice that for this implementation, Terraform registry modules were used with Terraform v0.12.28. This piece of code is added here so that you can compare both ways of defining infrastructure as code, but if you want to try and deploy it, it will work too! Keep in mind that you will have to set your SSH key pair in case you want to access the instance.
provider "aws" {
  region = "eu-west-1"
}

data "aws_vpc" "default" {
  default = true
}

data "aws_subnet_ids" "all" {
  vpc_id = "${data.aws_vpc.default.id}"
}

module "security_group" {
  source  = "terraform-aws-modules/security-group/aws"
  version = "3.12.0"

  name        = "http"
  description = "Security group for the example"
  vpc_id      = "${data.aws_vpc.default.id}"

  ingress_cidr_blocks = ["0.0.0.0/0"]
  ingress_rules       = ["http-80-tcp", "ssh-tcp"]
  egress_rules        = ["all-all"]
}
resource "null_resource" "dummy" {
  provisioner "local-exec" {
    command = "{ echo '#!/bin/sh '; cat ../install_server.sh; } > ../install_server_tf.sh"
  }
}
module "ec2-instance" {
  source  = "terraform-aws-modules/ec2-instance/aws"
  version = "2.15.0"

  name                        = "kubes-clouds-test-tf"
  ami                         = "ami-0c3e74fa87d2a4227"
  key_name                    = "cdk-key"
  instance_type               = "t2.micro"
  subnet_id                   = "${sort(data.aws_subnet_ids.all.ids)[0]}"
  vpc_security_group_ids      = ["${module.security_group.this_security_group_id}"]
  associate_public_ip_address = true
  user_data                   = "${file("../install_server_tf.sh")}"

  tags = {
    Owner       = "Kubes&Clouds"
    Environment = "test"
  }


}
Initialize your terraform directory containing the code, then build the deployment plan, and if everything looks good to you, confirm your deployment.
cd terraform
terraform init
terraform plan
terraform apply
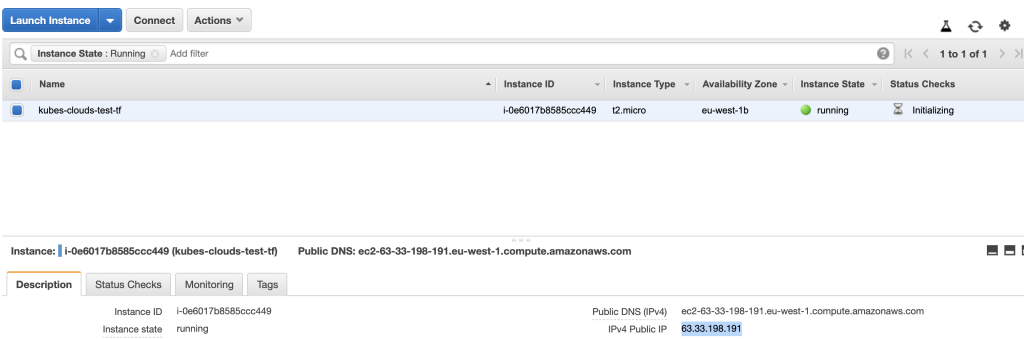
Like in the previous example, by accessing the public IP of the instance, you can check that the deployed web server is working correctly.
Once you have finished testing the Terraform deployment, destroy the previously created resources.
terraform destroy
Making it more interesting
Well, the previous example was interesting but yet too basic. Taking into account how much we like Kubernetes on this blog, it would be a great idea to deploy a Kubernetes cluster using AWS CDK. For this purpose we will use one of the examples provided by AWS in their CDK examples repository. In this case, we will be using AWS managed Kubernetes service, known as EKS. The code below can be found in this repository, alongside the typescript configuration files needed for its deployment.
import autoscaling = require('@aws-cdk/aws-autoscaling');
import iam = require('@aws-cdk/aws-iam');
import ec2 = require('@aws-cdk/aws-ec2');
import eks = require('@aws-cdk/aws-eks');
import cdk = require('@aws-cdk/core');

class EKSCluster extends cdk.Stack {
  constructor(scope: cdk.App, id: string, props?: cdk.StackProps) {
    super(scope, id, props);

    const vpc = new ec2.Vpc(this, 'EKSVpc');  // Create a new VPC for our cluster

    // IAM role for our EC2 worker nodes
    const workerRole = new iam.Role(this, 'EKSWorkerRole', {
      assumedBy: new iam.ServicePrincipal('ec2.amazonaws.com')
    });

    const eksCluster = new eks.Cluster(this, 'Cluster', {
      vpc: vpc,
      kubectlEnabled: true,  // we want to be able to manage k8s resources using CDK
      defaultCapacity: 0  // we want to manage capacity our selves
    });

    const onDemandASG = new autoscaling.AutoScalingGroup(this, 'OnDemandASG', {
      vpc: vpc,
      role: workerRole,
      minCapacity: 1,
      maxCapacity: 10,
      instanceType: new ec2.InstanceType('t3.medium'),
      machineImage: new eks.EksOptimizedImage({
        kubernetesVersion: '1.16',
        nodeType: eks.NodeType.STANDARD  // without this, incorrect SSM parameter for AMI is resolved
      }),
      updateType: autoscaling.UpdateType.ROLLING_UPDATE
    });

    eksCluster.addAutoScalingGroup(onDemandASG, {});
  }
}

const app = new cdk.App();
new EKSCluster(app, 'MyEKSCluster');
app.synth();
By following the previous steps, the stack can be created on our AWS account. In this case, we will be invoking the typescript compiler manually. Be patient as deploying the cluster may take a while.
git clone https://github.com/aws-samples/aws-cdk-examples
cd aws-cdk-examples/typescript/eks/cluster/
npm install
npm run build
cdk deploy
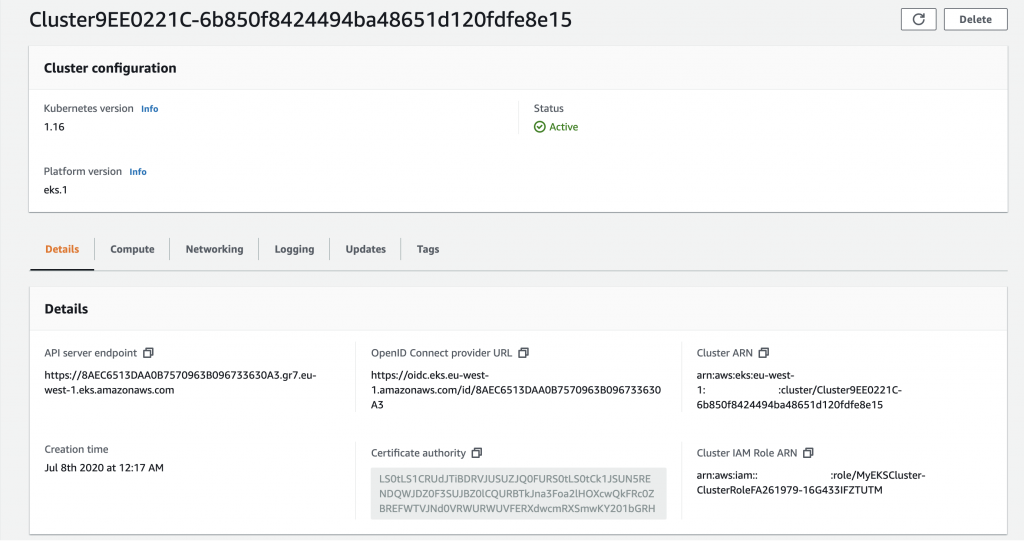
After some minutes, the EKS cluster will be up and running.
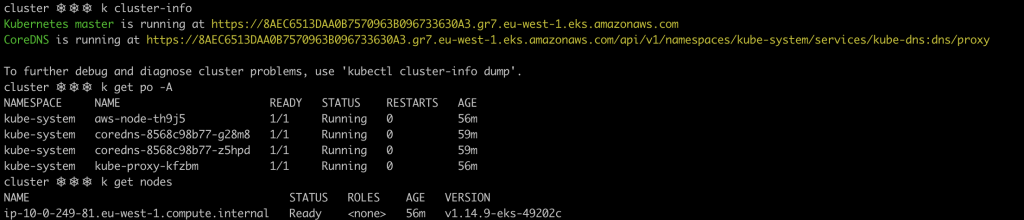
Once the cluster has been created, the CDK CLI will prompt the command needed to generate a kubeconfig to access the cluster.

Issue the following command to generate the kubeconfig. You can copy it directly from the CDK CLI output.
aws eks update-kubeconfig --name <cluster-name> --region <region>
If everything worked out as it should, you will be able to access your new cluster!
Important
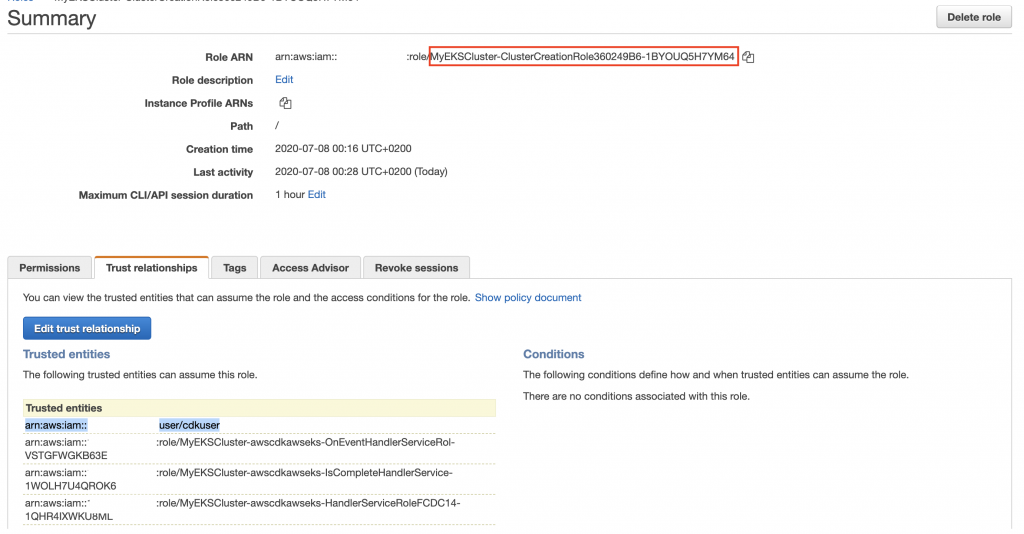
If you get a You must be logged in to the server (Unauthorized) error when accessing the EKS cluster with the generated kubeconfig, you will need to give the AWS CDK user permissions to assume the EKS Cluster creation role. This is a direct consequence of how IAM roles are mapped to the Kubernetes RBAC. When a cluster is created, only the user/role that created the cluster can access it. To solve this problem quickly, just grant the IAM user that was used with the AWS CDK permission to assume the _
Finally, destroy the EKS cluster and the associated resources so that you don’t have any surprises with your AWS bill!
cdk destroy
If you want to learn more about the AWS CDK you can go through the different examples in CDK examples repository. There are quite a lot of interesting use cases, including serverless architectures, using different languages. In the future, new articles with new languages will be published here in Kubes&Clouds.