Let’s be honest, managing Kubernetes clusters is not an easy task, even when it comes to managed Kubernetes services. Controlling the overall infrastructure, performing cluster upgrades and tracking the configuration of each cluster can really become a challenge. Infrastructure as Code (IaC) comes in handy here, with declarative languages such as Terraform and CloudFormation. However, the learning curve of this kind of languages may be steep for those with no previous experience in IaC. Thus, it would be nice to manage clusters in the same way that Kubernetes resources are managed: with manifests and a CLI.
EKS by AWS
In this post, eksctl will be introduced and reviewed. eksctl is is a CLI tool for creating clusters on AWS EKS developed by Weaveworks. It is written in Go, follows a ‘kubectl-like’ syntax, and relies on CloudFormation for infrastructure deployment and management. Furtermore, cluster configurations can be specified as yaml files, enabling infrastructure versioning thanks to SCM systems.
As in previous posts, an example repository has been developed so that you can test eksctl with some existing configurations. You can find the repository here.
Installing eksctl 📥
Before getting eksctl installed, you will need to install the AWS CLI and the aws-iam-authenticator in case they are not already installed. The latter is installed with version 1.16.156 or greater of the AWS CLI and is required in order to generate the kubeconfig token based on AWS IAM policies.
Once these pre-requisites are fulfilled, install eksctl with the following commands. If you’re not using Linux, you can check the installation commands for your OS here.
curl --silent --location "https://github.com/weaveworks/eksctl/releases/latest/download/eksctl_$(uname -s)_amd64.tar.gz" | tar xz -C /tmp
sudo mv /tmp/eksctl /usr/local/bin
Deploying a simple cluster 🕹️
The following code snippet shows an eksctl configuration file that is used to generate a simple EKS cluster with one node. The cluster to be deployed runs Kubernetes 1.17.
apiVersion: eksctl.io/v1alpha5
kind: ClusterConfig

metadata:
  name: simple-cluster
  region: eu-west-1
  version: '1.17'

nodeGroups:
  - name: ng-1
    instanceType: m5.large
    desiredCapacity: 1
    privateNetworking: true
    availabilityZones: ["eu-west-1a", "eu-west-1b", "eu-west-1c"]
    labels: { tier: new }
Prior to the deployment, you will need to configure your AWS credentials using the AWS CLI. In order to do so, you will need an AWS secret key and access key pair. If you don’t have one yet, you can create a new one in the AWS IAM console. Check this documentation as a guide.
aws configure
Keep in mind that the user which uses those credentials should have permissions to create the infrastructure specified in the code. For this example you can use the AdministratorAccess managed policy. Store well your credentials, and once this user is no longer needed, remove it, to avoid unnecessary risks.

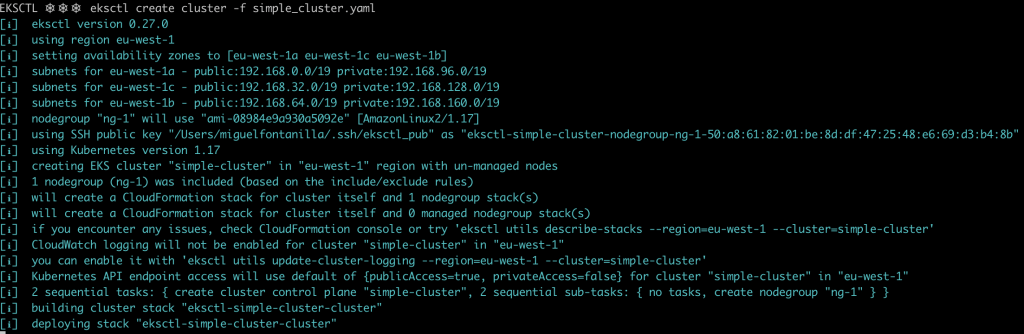
Once your credentials are set, you can start using eksctl. By issuing the following command, eksctl will start deploying the EKS cluster in your account. Take it easy as it may take a while ⌛.
eksctl create cluster -f simple_cluster.yaml
Once the cluster has been created, eksctl will update your local kubeconfig and context so that it points to the newly created cluster, so you will be able to communicate with the cluster by using kubectl.
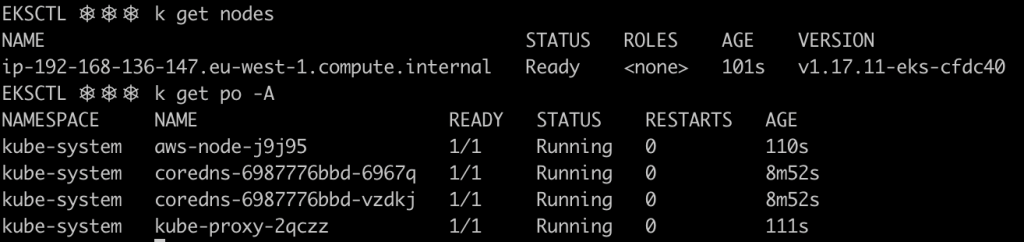
Remember that eksctl syntax is pretty similar to the one used by kubectl. You can try executing the following commands. The last one shows the IAM identities that are mapped to Kubernetes RBAC in the cluster. These identities are persisted in the aws-auth ConfigMap in the kube-system namespace.
eksctl get cluster  --region eu-west-1
eksctl get nodegroup --cluster simple-cluster --region eu-west-1
eksctl get iamidentitymapping  --cluster simple-cluster --region eu-west-1
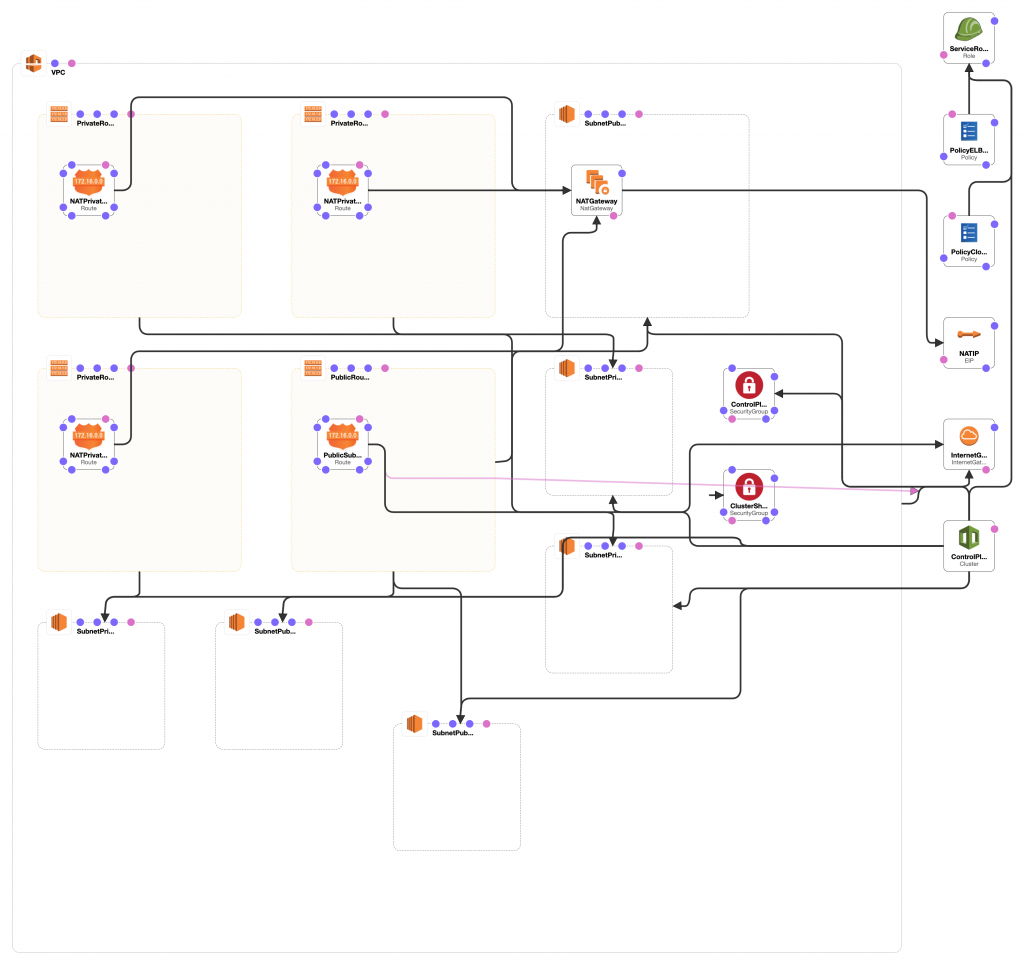
As commented before, eksctl relies on CloudFormation to generate the AWS infrastructure and resources, thus, if you inspect your stacks, you will be able to see the different resources generated by eksctl on your behalf.
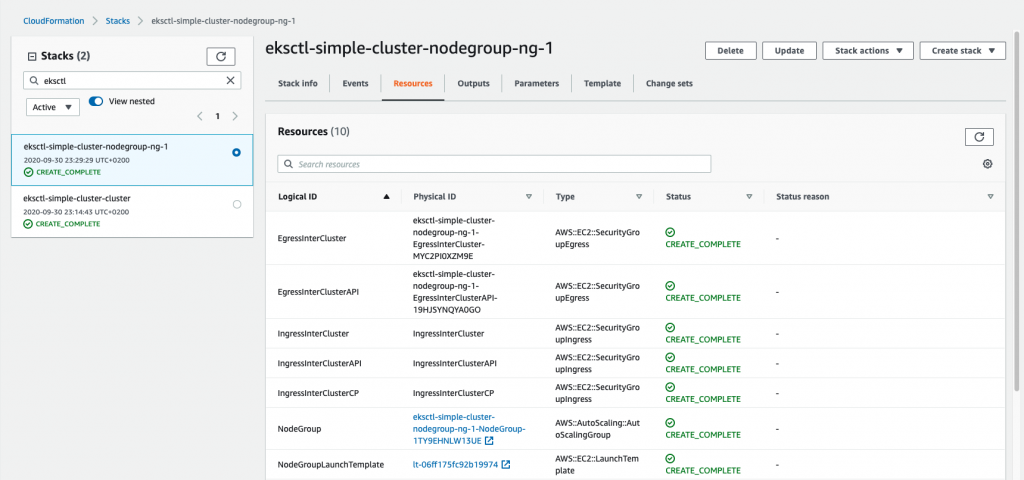
TIP: You can have a pretty visual overview of the infrastructure deployed by each stack using the AWS CloudFormation Designer. The image below shows the elements created by the cluster stack.
Once you’re done playing with your EKS cluster, delete the cluster and its associated resources by issuing the following command.
eksctl delete cluster -f simple_cluster.yaml
Advanced configuration ⚙️
In this section, we will be going through more complex examples, resembling production-like environments, features and configurations.
Autoscaling clusters 🤖
Selecting the right size for a cluster isn’t always easy, and as you may know, cluster workloads fluctuate over time. eksctl can be used to scale up and down node groups when needed, but it’s a manual process.
eksctl scale nodegroup --cluster=<cluster-name> --nodes=5 <nodegroup>
However, AWS autoscaling service can help us using resources more efficiently and ensuring that the cluster resources are expanded automatically when needed. Notice how the IAM policies required by the autoscaler to make calls to the AWS APIs, are specified under the iam.withAddonPolicies directive. Furthermore, the minimum and maximum size of the autoscaling group is defined.
apiVersion: eksctl.io/v1alpha5
kind: ClusterConfig

metadata:
  name: as-cluster
  region: eu-west-1
  version: '1.17'

nodeGroups:
  - name: ng-1
    instanceType: m5.large
    iam:
      withAddonPolicies:
        autoScaler: true
        ebs: true
    desiredCapacity: 1
    minSize: 1
    maxSize: 3
    volumeSize: 50
    labels: { role: workers }
    privateNetworking: true
    availabilityZones: ["eu-west-1a", "eu-west-1b", "eu-west-1c"]
Create your cluster by issuing the following command.
eksctl create cluster -f asg_cluster.yaml
Once the cluster is up and running, you will need to deploy the cluster autoscaler. It is a component which runs in the cluster as a deployment, and detects whether the number of nodes in the cluster is the right one to serve all the workloads defined, scaling the nodes up and down when needed.
The following command deploys the cluster autoscaler to your cluster. Take into account, that the cluster autoscaler needs to know the name of the cluster to act on. The deployment present on the autoscaler_basic.yaml file has already been configured to work within this cluster. Thus, you will only need to issue the following command without no further configuration to make the cluster autoscaler work.
kubectl apply -f autoscaler_basic.yaml
If everything went well, you should be able to see the cluster autoscaler pod running in the cluster, in the kube-system namespace.

Let’s try our newly deployed autoscaler. First verify that your cluster is using just one node as specified by the desiredCapacity: 1 directive in the configuration file.

Now let’s stress our cluster out by deploying a lot of nginx replicas.
kubectl create deployment nginx --image nginx
kubectl scale deployment nginx --replicas 70
If you check the state of the pods seconds after issuing the previous commands, you will notice that several ones are stuck in the Pending state. Give the cluster autoscaler some minutes to make its magic and you will see how new nodes are added automatically to your cluster!

If you delete your deployment and all its associated replicas, and wait a few minutes, you will see how the autoscaler scales down the cluster nodes.
kubectl delete deployment nginx
Once you’re done playing with your EKS cluster, delete the cluster and its associated resources by issuing the following command.
eksctl delete cluster -f asg_cluster.yaml
Cluster Logging 📝
The Kubernetes control plane is made up of several components and their logs can be really helpful, specially for troubleshooting and debugging purposes. Control plane logging can be enabled using the clusterLogging directive within the cloudWatch section. The following example, enables the logs of all the control plane components.
apiVersion: eksctl.io/v1alpha5
kind: ClusterConfig

metadata:
  name: logging-cluster
  region: eu-west-1

nodeGroups:
  - name: ng-1
    instanceType: m5.large
    desiredCapacity: 2

cloudWatch:
  clusterLogging:
    enableTypes: ["audit", "authenticator", "scheduler", "api", "controllerManager"]
#    enableTypes: ["*"]
Create your cluster with control plane logging enabled.
eksctl create cluster -f logging_cluster.yaml
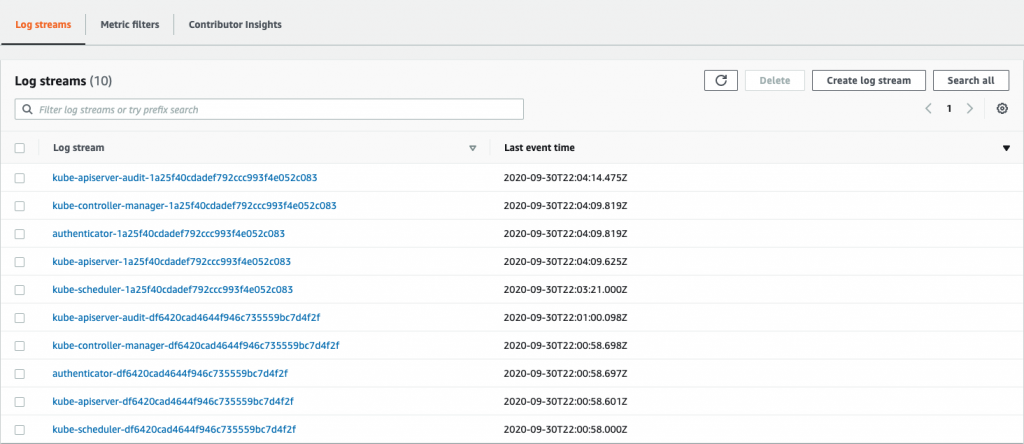
Once the cluster is ready, if you check CloudWatch Logs, you will be able to see the log entries for the different control plane components.
Clean up once you have checked the logs.
eksctl delete cluster -f logging_cluster.yaml
Node groups & cool stuff 😎
Let’s deploy some fancy stuff. How about a multi node-group cluster, so that different workloads can be scheduled on each kind of node? And how about adding spot instances for those batch, non-priority workloads? Let’s add a ssh key too (change it so that eksctl uses the public key you prefer), to ensure that we can connect via SSH to the instances and different IAM policies.
apiVersion: eksctl.io/v1alpha5
kind: ClusterConfig

metadata:
  name: multi-cluster
  region: eu-west-1

nodeGroups:
  - name: ng-1
    instanceType: m5.large
    iam:
      withAddonPolicies:
        imageBuilder: true
        autoScaler: true
        externalDNS: true
        ebs: true
        efs: true
        albIngress: true
        cloudWatch: true
    desiredCapacity: 1
    minSize: 1
    maxSize: 3
    volumeSize: 50
    labels: { role: workers }
    privateNetworking: true
    ssh:
      publicKeyPath: ~/.ssh/eksctl_pub
    availabilityZones: ["eu-west-1a", "eu-west-1b", "eu-west-1c"]

  - name: ng-2
    instanceType: m5.large
    iam:
      withAddonPolicies:
        imageBuilder: true
        autoScaler: true
        externalDNS: true
        ebs: true
        efs: true
        albIngress: true
        cloudWatch: true
    desiredCapacity: 2
    minSize: 1
    maxSize: 3
    volumeSize: 100
    labels: { role: builders }
    privateNetworking: true
    ssh:
      publicKeyPath: ~/.ssh/eksctl_pub
    availabilityZones: ["eu-west-1a", "eu-west-1b", "eu-west-1c"]

  - name: ng-3
    minSize: 1
    maxSize: 2
    labels: { role: ephemeral-workers}
    volumeSize: 50
    ssh:
      publicKeyPath: ~/.ssh/eksctl_pub
    iam:
      withAddonPolicies:
        imageBuilder: true
        autoScaler: true
        externalDNS: true
        ebs: true
        efs: true
        albIngress: true
        cloudWatch: true
    instancesDistribution:
      maxPrice: 0.017
      instanceTypes: ["t3.small", "t3.medium"] # At least one instance type should be specified
      onDemandBaseCapacity: 0
      onDemandPercentageAboveBaseCapacity: 50
      spotInstancePools: 2
Create your super fancy cluster.
eksctl create cluster -f multi_ng_cluster.yaml
If everything went well, you will be able to see three different node groups running and a total of 4 worker nodes.

Don’t forget to delete the cluster when you finish playing around.
eksctl delete cluster -f multi_ng_cluster.yaml
TIP: If you plan to run workloads on spot instances, consider deploying the AWS Node Termination Handler in your cluster, as it helps reescheduling workloads running in spot nodes that are going to be terminated.
Upgrading clusters 🆕
Finally, let’s see how to perform a cluster upgrade using eksctl. In order to do so, we will deploy a simple cluster with Kubernetes 1.16, and then we will upgrade it using a different configuration file. Notice that the node groups of each configuration file have a different name.
apiVersion: eksctl.io/v1alpha5
kind: ClusterConfig

metadata:
  name: simple-cluster-upgrade
  region: eu-west-1
  version: '1.16'

nodeGroups:
  - name: ng-1-pre-upg
    instanceType: m5.large
    desiredCapacity: 1
    privateNetworking: true
    availabilityZones: ["eu-west-1a", "eu-west-1b", "eu-west-1c"]
    labels: { tier: old }
First, create the 1.16 EKS cluster and verify the version that’s running in the cluster.
eksctl create cluster -f upgrade_cluster.yaml

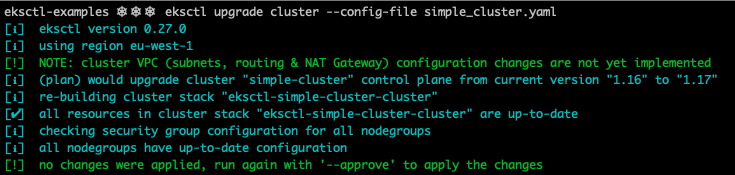
Now, let’s get the cluster upgraded! The following command computes the upgrade plan for the control plane of the cluster, and displays the operations to be performed.
eksctl upgrade cluster --config-file simple_cluster.yaml
If everything looks good to you, issue the command again adding the --approve flag and wait for eksctl to finish upgrading the control plane ⌛😴☕.
eksctl upgrade cluster --approve --config-file simple_cluster.yaml
The next elements to be upgraded are the workers itself. To do so, create a new node group using the simple_cluster.yaml.
eksctl create nodegroup --config-file simple_cluster.yaml
Now two nodes are present, each one belonging to a different node group and running different Kubernetes version. With this approach, you can migrate your workloads from the old nodes to the new ones reducing the downtime for the applications during the upgrade process.

Once the new node group is ready, delete the old node group.
eksctl delete nodegroup --approve --config-file upgrade_cluster.yaml --only-missing
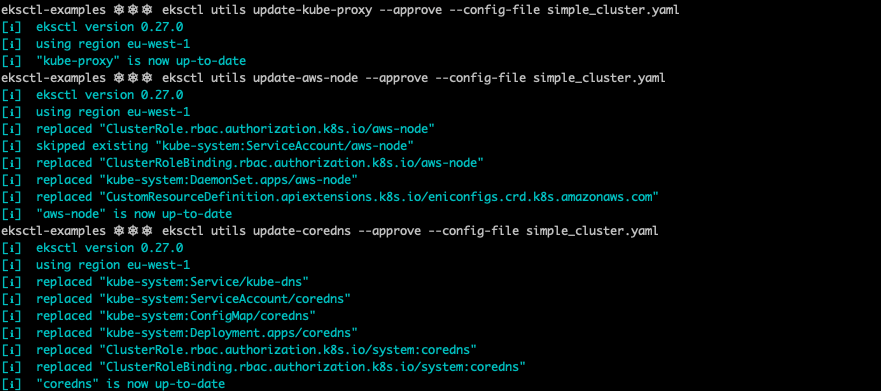
Finish by upgrading the default EKS add-ons in your cluster. By issuing the following commands, kube-proxy, coreDNS and aws-node are upgraded to the version that matches the one of the cluster.
eksctl utils update-kube-proxy --approve --config-file simple_cluster.yaml
eksctl utils update-aws-node --approve --config-file simple_cluster.yaml
eksctl utils update-coredns --approve --config-file simple_cluster.yaml
And voilà, your cluster is running Kubernetes 1.17!

Finally, clean everything up.
eksctl delete cluster -f simple_cluster.yaml
Keep learning 👩💻👨💻
If you liked eksctl, take some time to go through the examples repository, as you will find quite a lot of interesting use cases. I would also recommend visiting Weaveworks Github page, as you will find some other interesting DevOps tools and projects.